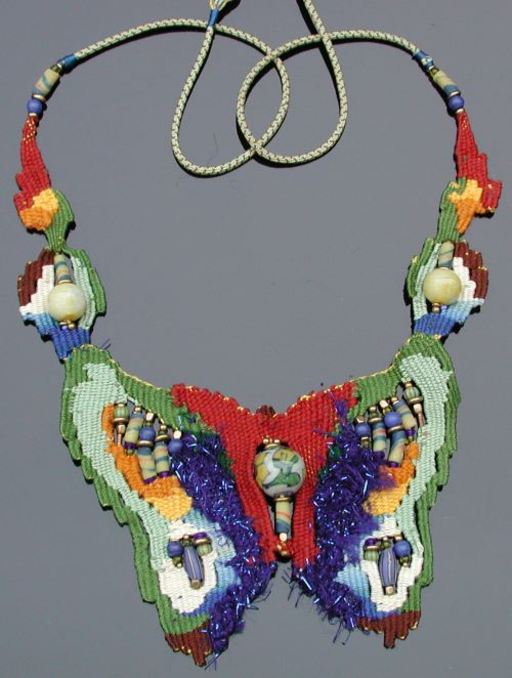
I made this piece immediately after finishing the red and yellow one, eager to apply everything I had just learned not only in the execution of the piece, but in its design as well. One of the first changes I made to the technique was to substitute map pins for bank or banker's pins, which are not readily available (at least under that name) in the Midwestern United States. But perhaps I should back up and expain the technique.
Like the wall hangings it's based upon, tapestry needleweaving is a simple tabby weave, in which the weft goes ‘weft’ to right, alternating over and under the warps, or the fixed vertical threads and then, upon reaching the edge of the fabric, reverses (moving right to left). On the return, the weft goes under a warp it went over on the previous pass, and over a warp it previously passed under. Sounds complicated, but is very straightforward to do. Tapestries, of course, are made upon huge looms, with the wefts wrapped upon holders, or shuttles. Moreover the alternating over and under warps can be spread by the loom, creating a space, or shed, through which the weaves shoots the shuttles.
This smaller scale version of the technique is similar. As with traditional tapestry, you start by making a sketch of the design on paper (a cartoon). Banes always made hers on 4 to 1 graph paper to facilitate even pin placement, but I found my eyeballs sufficiently precise for my purposes. After attaching (e.g. taping) the cartoon onto a board—either several layers of foam core taped together, or a half inch (12cm) thick piece of LDF (low density fiberboard, my preference)—the next step is to pin the top and bottom of the design. The board and the pins, by providing support for the (usually) vertical warps, therefore are the loom.
After placing pins (at a 45 degree angle, away from the center of the design, for more holding power) at the top and bottom of the design at regular intervals—this is where the lines on the graph paper come in handy—then you loop a string—linen or F weight stringing thread, for example, around the (outside of the) pins, creating a tight zigzag—the warps. It is on a pair of warps (held by one pin) on which the beads are strung, and around them that the fabric is woven. Sounds complicated, but it isn't, really.
What can be challanging is an extremely irregular silhouette, such as this butterfly, which was just tricky enough to hold my interest through tedious hours of weaving over the warps. This miniature form differs from its traditional cousin in that the weaver uses a needle, both to pick up and slide under every other warp, and to hold the thread. However, only short lengths of yarns are necessary; though the picking method of creating a shed is very slow. One can also wrap the warps as with macrame. The red and yellow necklace uses this technique.

silk (principly the kumi'ed ties), cotton, synthetic fibers, African trade beads, powdered sand cast beads from Africa, with a handpainted ceramic focal bead from India
Unless otherwise noted, text, image and objects depicted therein copyright 1996--present sylvus tarn.
Sylvus Tarn