Introduction.
The goals as stated on the handout for this class, which is basically Jewelry/Metals III, are for the student to raise a 6” diameter disk of (at least 18ga recommended) metal to form an object incorporating a half-spherical shape (e.g. a measuring cup), a locket or bracelet with a hinge and three pieces related in some way—by a narrative, for example.
*My* goals were to brush up on my metalworking skills, interact with other students for broad creative inspiration, and learn to make clasps that I could incorporate into my bead-strung works, along with my lampwork beads.
The teacher, who for privacy reasons I will refer to as the instructor (though I use hir preferred title in class, of course) hereon, and I had relatively long discussions before I chose this particular course, which I regarded as the best match for my current skill levels (or lack) as well as the one with the best tradeoffs between disciplining me to do stuff I needed to work on, interacting with the other students, and stuff I wanted to work on. During these conversations, the instructor showed me some of the projects other students had made to complete this course.
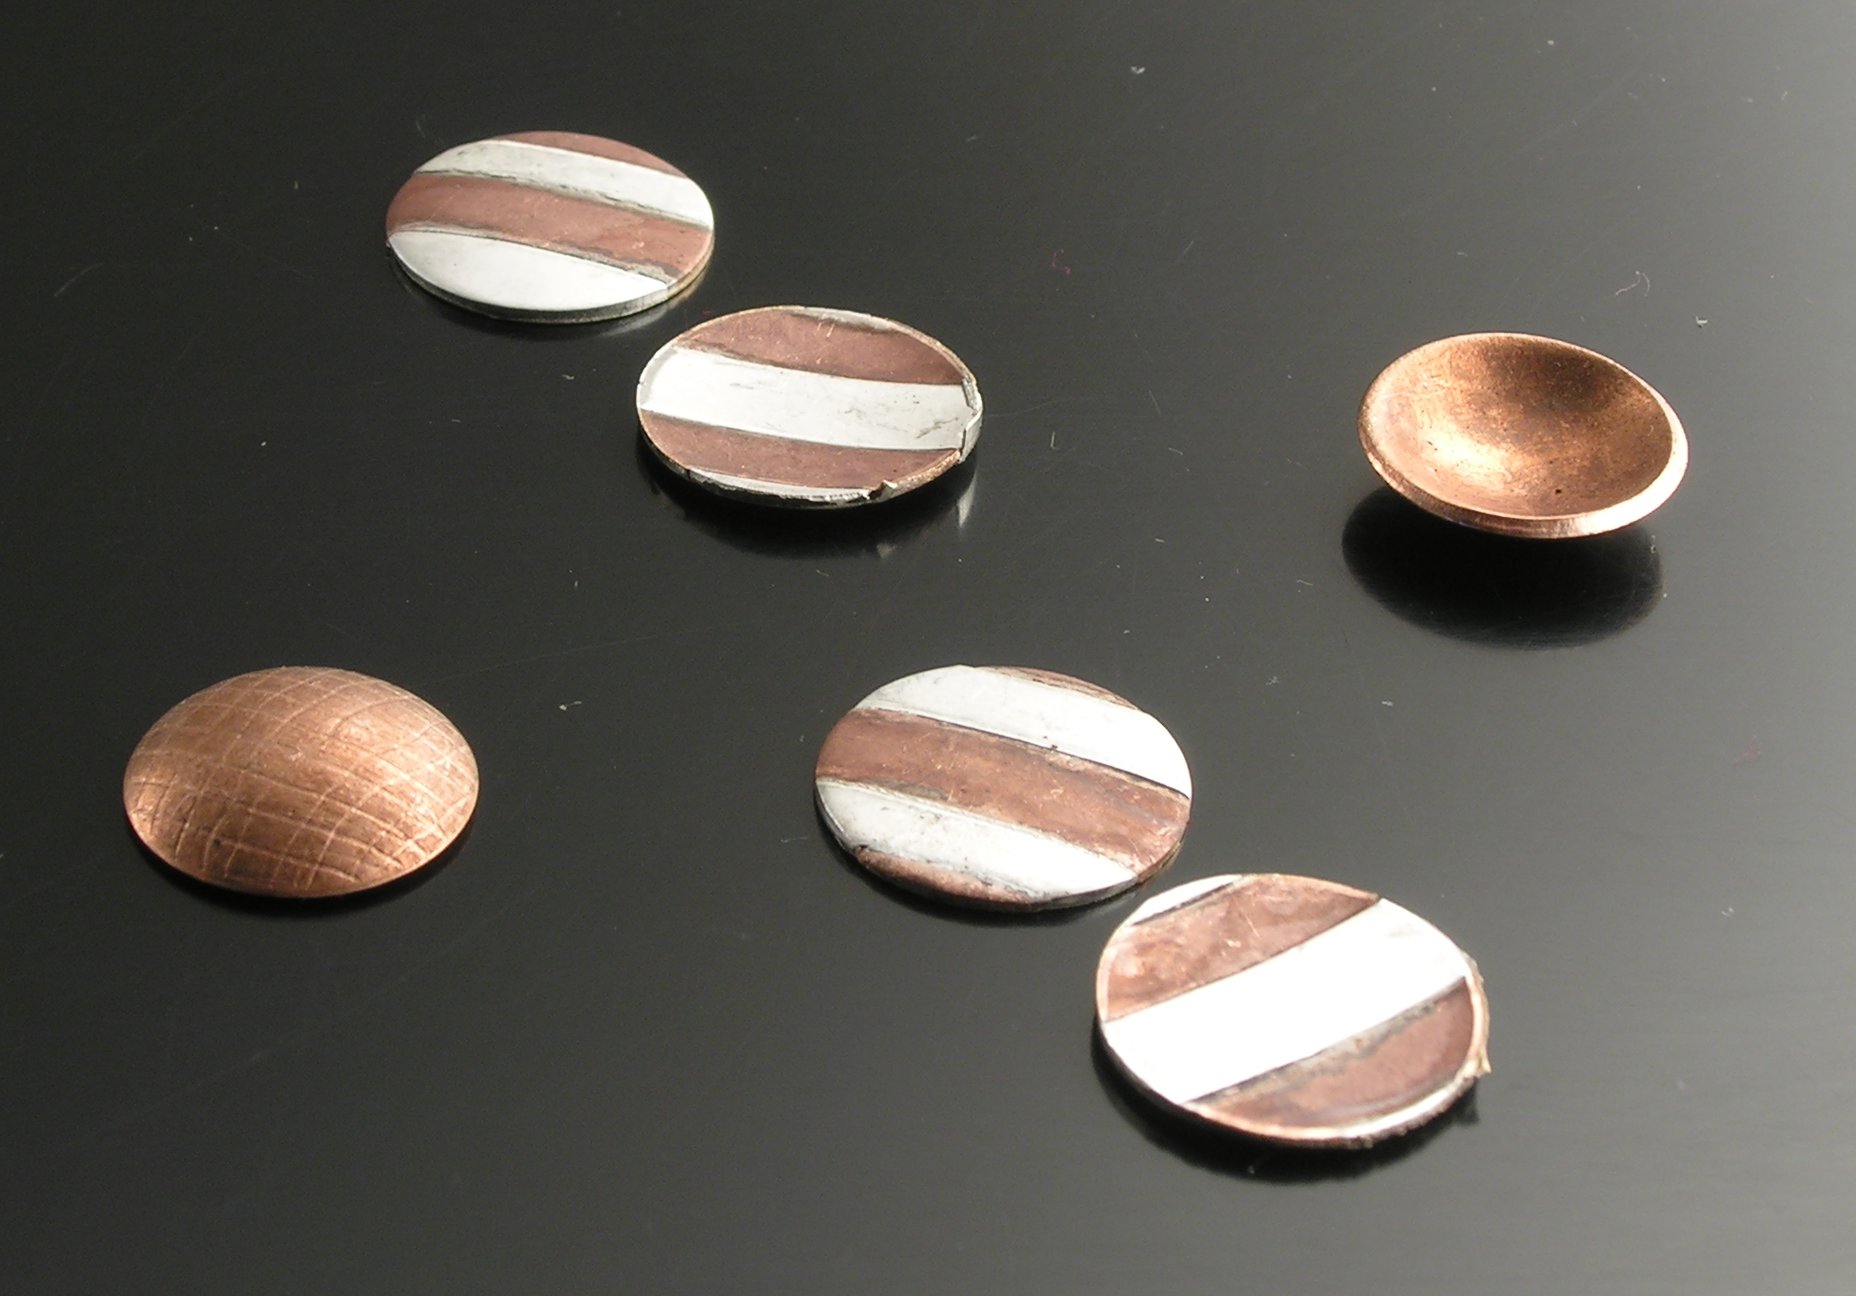
Cutting these disks were my introduction to using a hydraulic press and circle punch; domed with daps and wooden dapping block. My goal during the first month or so of class was to use one new piece of equipment every day. The strips of copper and silver—marriage of metals—are left over from prior metalworking classes. These were to be practice pieces for soldering.
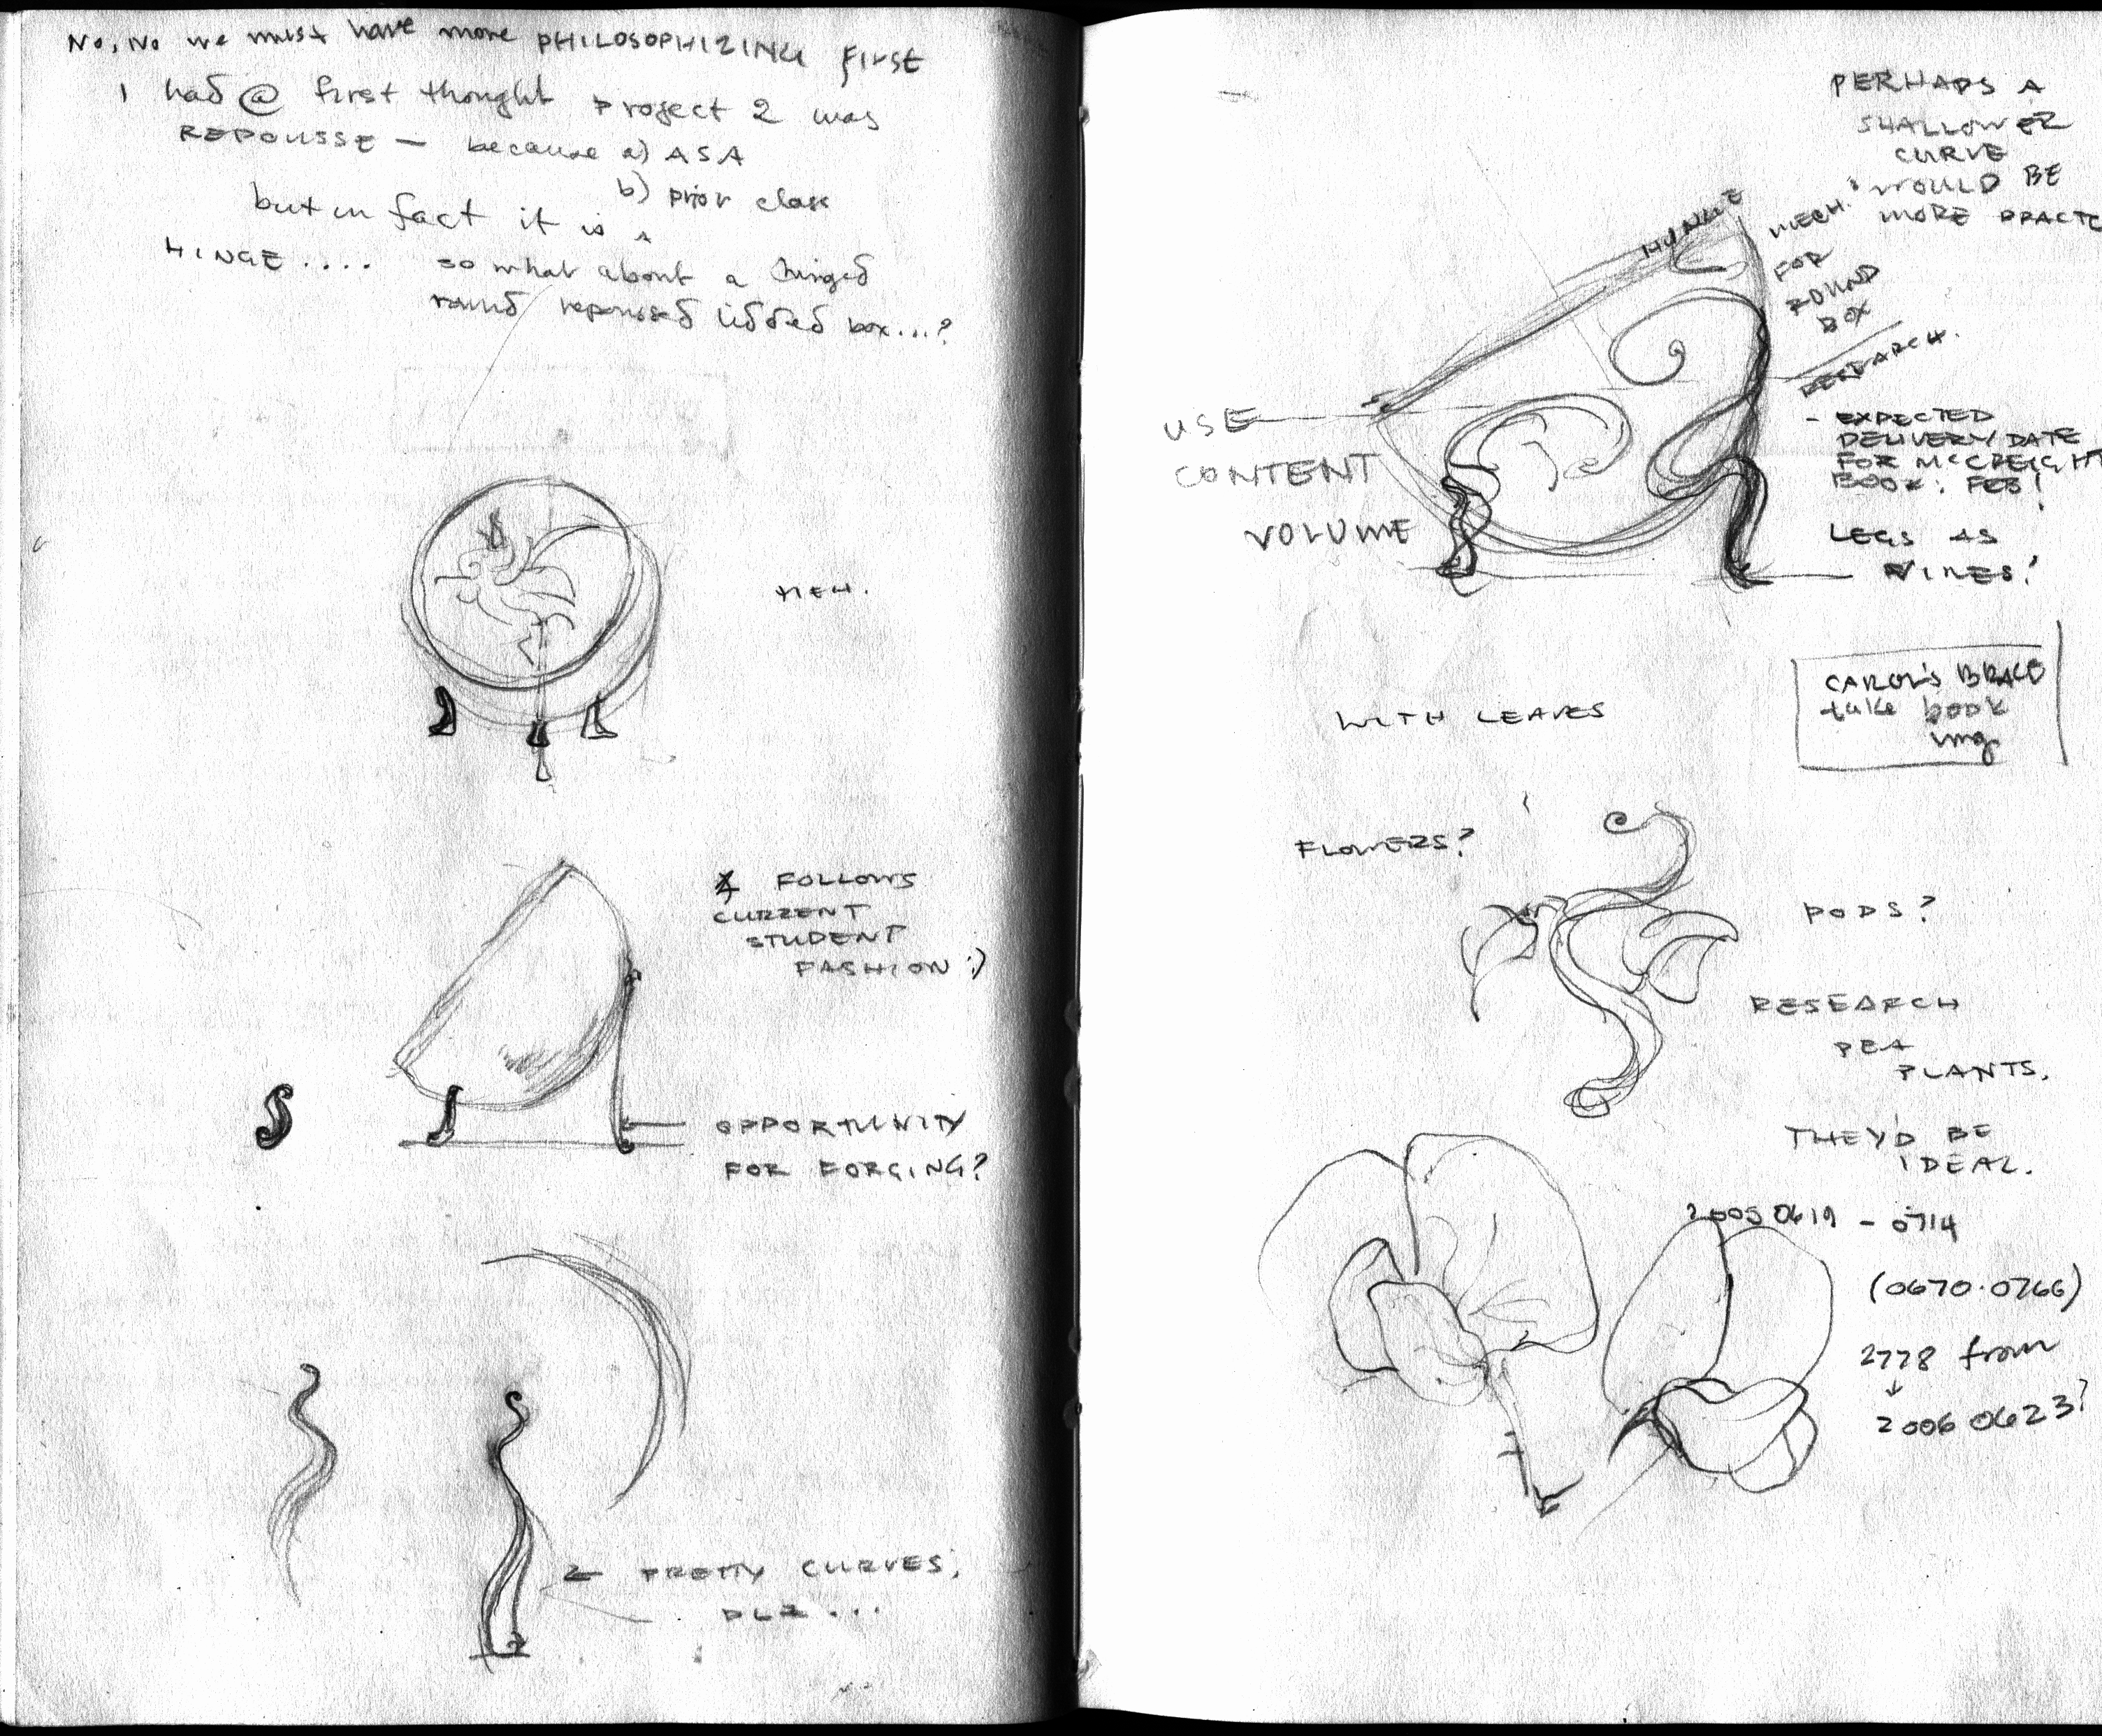
One of the reasons I enjoy commissions is incorporating others’ ideas into my work. This would give the project additional parameters, as I incorporated influences from other student projects:
- tipping the vessel at an angle
- adding a repoussed lid
- decorating the rim with 23karat gold
The first came from a prior student who had done the same; the second, the repoussed lid, had a special appeal for two reasons: one is that I made a repoussed vessel in Metals II with Fike, long ago—the other, that Jewelry II students in this program make a box with a repoussed lid. It just tickled my sense of humor, or rightness, to incorporate this reference to the traditions of the two programs. As the Jewelry II students incorporated their repousse into their box top, I would incorporate a hinge into my lid. I have a cute little pewter box with a hinged lid, and it's one of my favorite boxes; so I thought I would like this. Certainly more than a hinged bracelet, which I couldn't imagine wearing. (That was before I recalled all those traditional hinged bracelets, the cuffs you see from places like India or Arabia—for some reason I was thinking of these commercial hollow form thingies, which are indeed ugly.)
Besides, I like doing repousse.
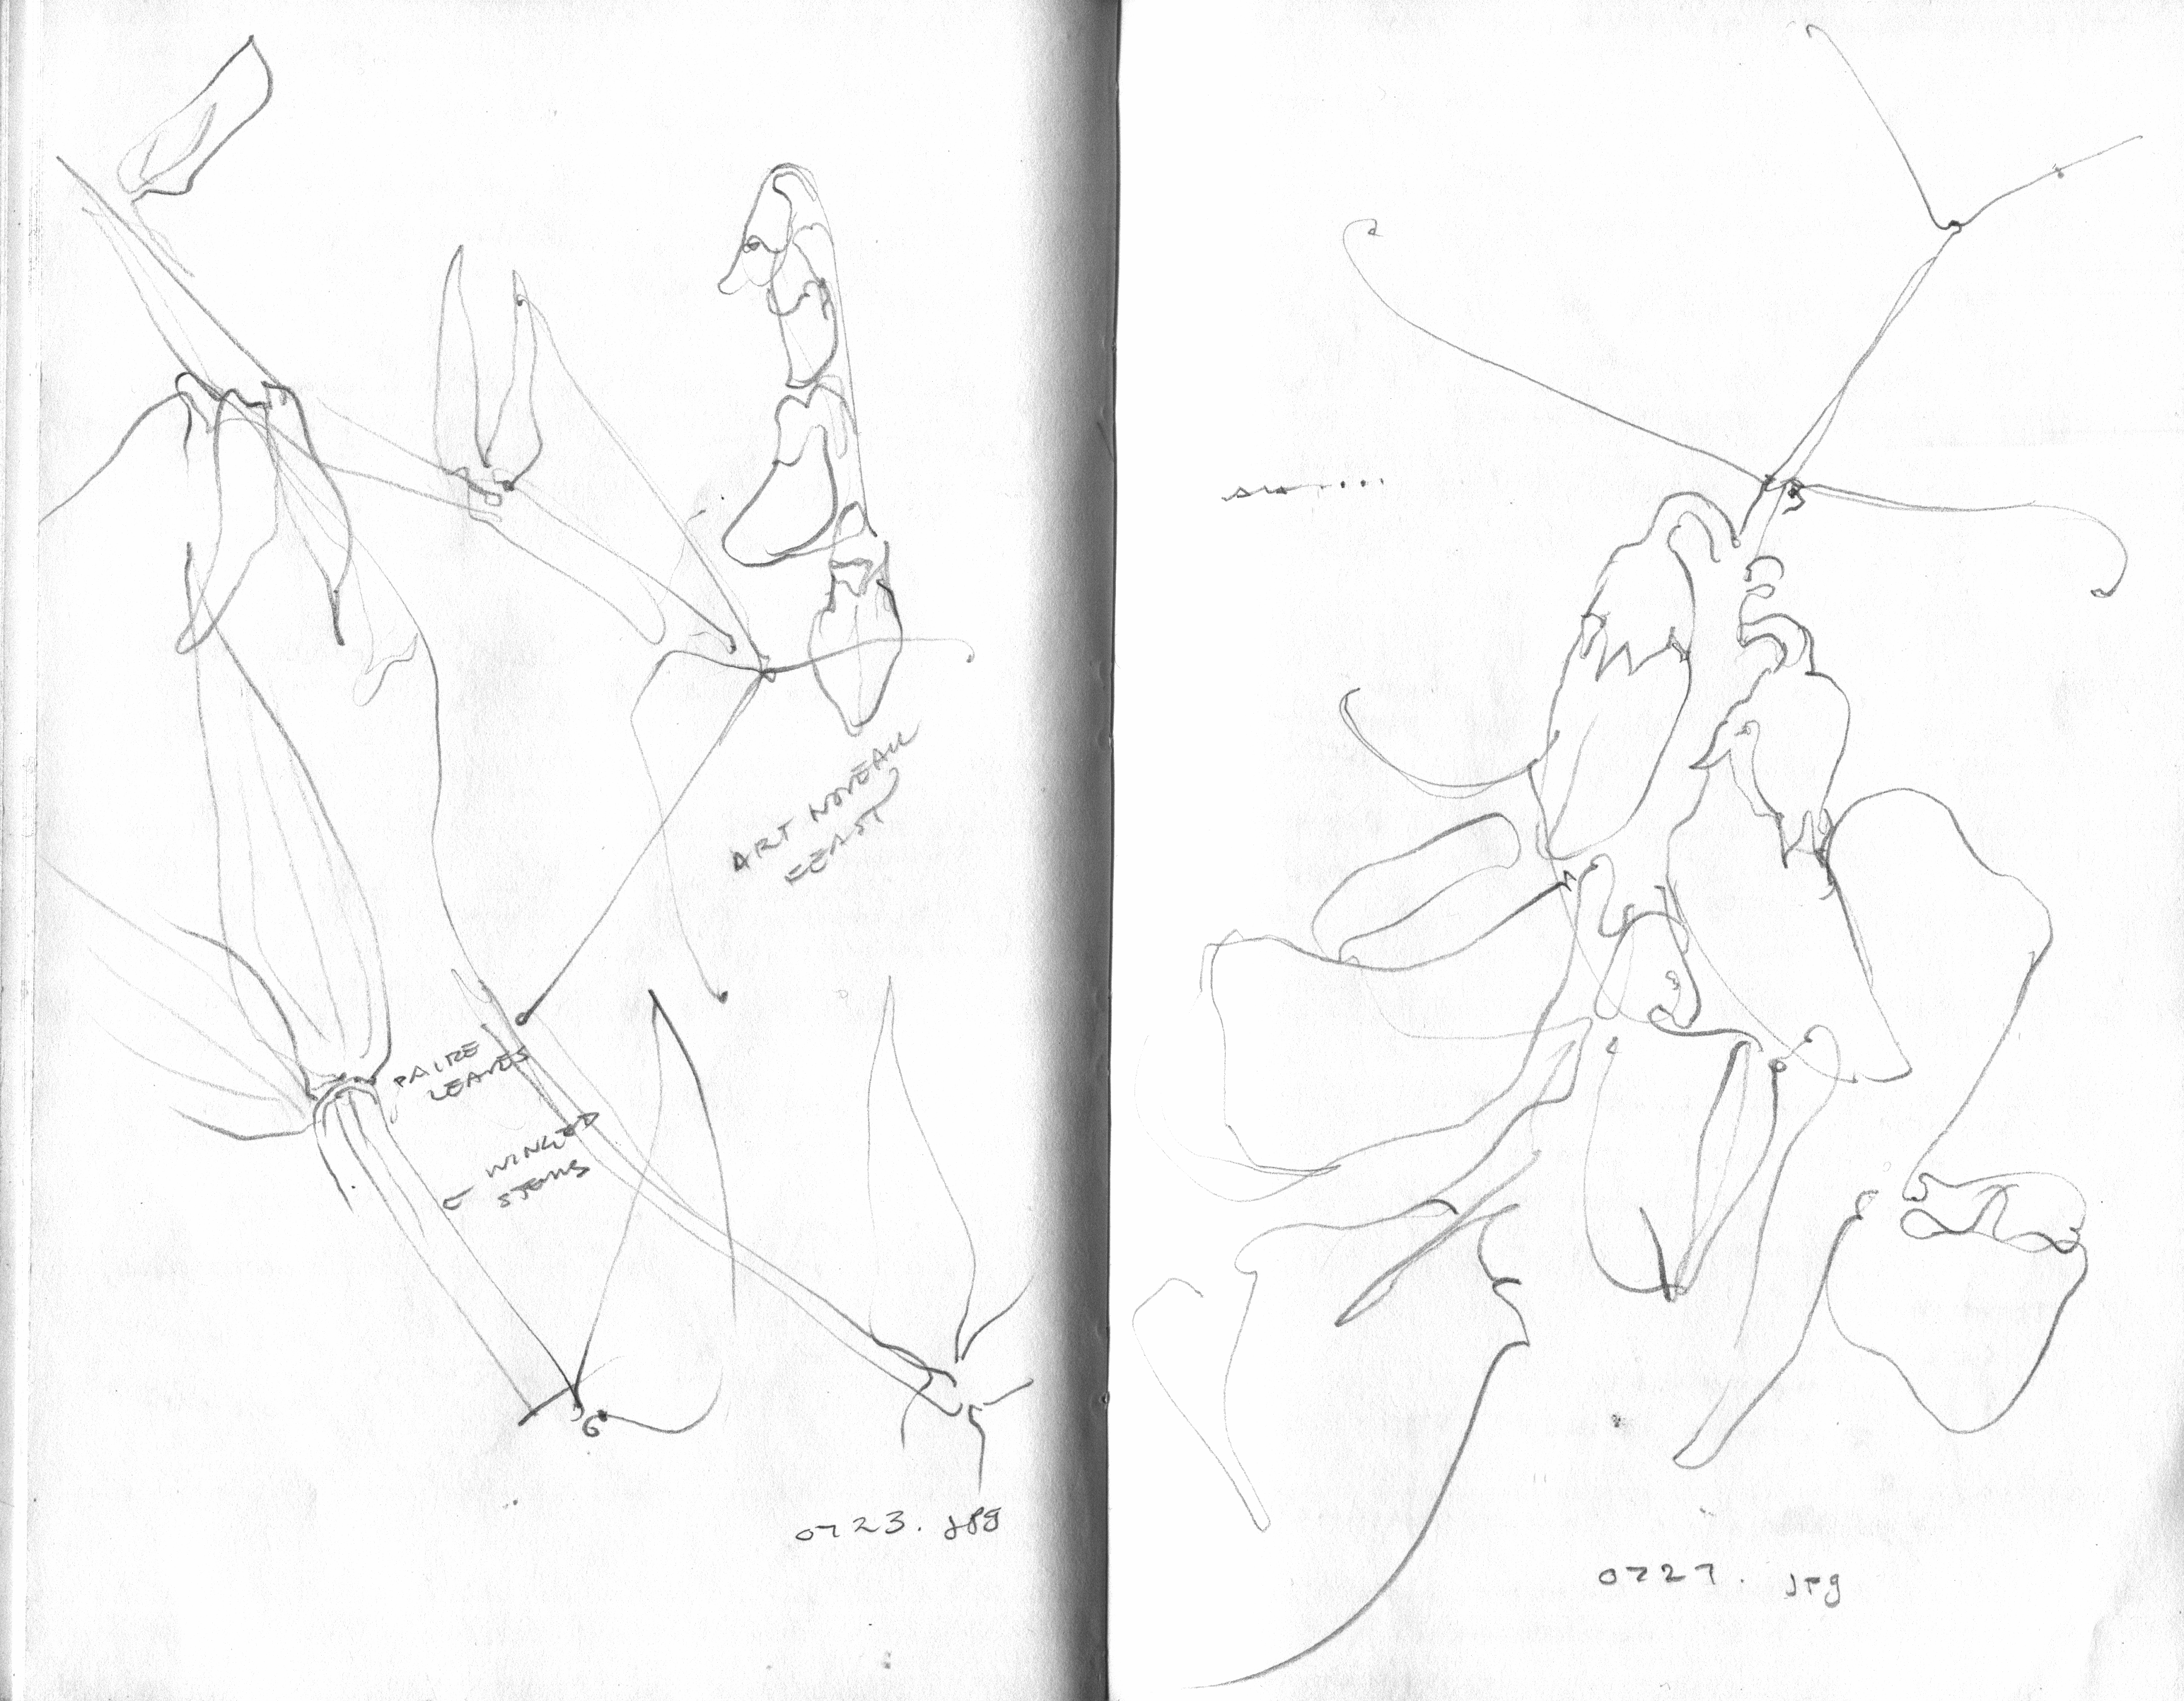
sketches from photographs I took of pea flowers during various bicycle rides, 2005.
The third came from out of lecture/demo by David Huang , who had many interesting things to say, and deserves a post all by itself, but we—that is to say, the instructor, a grad student, a non-trad student specializing in raised vessels (and therefore particularly interested in Mr. Huang's work) and myself—talked at some length about his practice of brazing (or soldering if you prefer) sterling silver rims on pieces. This, along with gilding the interiors with gold, gives his work a distinct look—that something “extra”—that marks it as special.
Early sketches. As you see it didn't take long to move to the idea of pea plants as the main motif.
I understood completely why he put the half round wire on his vessels, but it bothered me, because it seemed “too manufactured”, too similar to shiny rims, which stand out in a similar way on some enameled cookpots I own, compared to the dark, patinaed, highly textured exteriors. It does, however, provide a useful transition between the dark exterior and the luminous 23k gold interiors. Moreoever, I had by this time recognized highlighting the sterling lid with 23k gold would make for a nice frame; besides which I realized that just having a rough, uneven edge, though I liked the look of it, would present my viewer with a dilemma: did that lazy artist leave it that way cuz of the lack of technique, or cuz she liked it?
I will return to this.
Part I. Raising.
Tim McCreight notes that raising a horn-shape is the easiest to do, and—what a surprise—that's what my first vessel, which features a running rejiquar —is shaped like. I was actually perfectly free to attempt a more complicated shape than a half-sphere, but attempting to make round objects has been a big goal of mine for, um, lessee, the last decade now? So I stuck with that. I imagine I used the brake—a lovely shear that will cut metal 30” or more wide—to chop off a piece of 18gauge copper 6x6”.
The traditional thing to do is to draw diagonal lines corner to corner to find the center, but I think I just ended up setting my compass to three inches, and, after positioning the lead side near the edge, found the center that way, and drew (not scribed) the circle. In any event a fellow student (our resident raising expert, A.) helped me use the shear to rough-cut the circle, and the disk sander to smooth and even the edges.
I love time-saving tools.
Then I had to bang on it to put dents in it, using a nice new sandbag. It looks stupid, but it is indeed the way you traditionally start raising something like this. The fancy term is ‘bouging’, which so far as I could tell, is basically french for ‘moving’ or ‘shifting’. Then anneal. The school uses a big ole atmospheric weed-burner for this task, and was my introduction to this sort of torch, which I'd never used before. Do the bang/anneal two more times. The next step can be carried out in one of two ways—either by crimping, or raising in courses, on a stake. In the latter case, you mark your metal in concentric rings, approximately 1/2” (12mm) apart, with soft graphite (so as not to scratch), as a guide.
Then you position your bowl-to-be on this curved thingie that looks like a cross between the end of a handrail and a blunt-ended longhorn made of steel, at an angle, and attempt to bang the metal down to steel stake beneath. Huang, we all noticed, wears a glove on the hand holding the metal in place. The trick is to push the metal down to the stake, not just stretch it in place. You tell the difference between the two by the sound. You want that nice ringing sound. I couldn't tell the difference.
So I was very bad at it, and profoundly grateful to A. for giving me a helping hand.
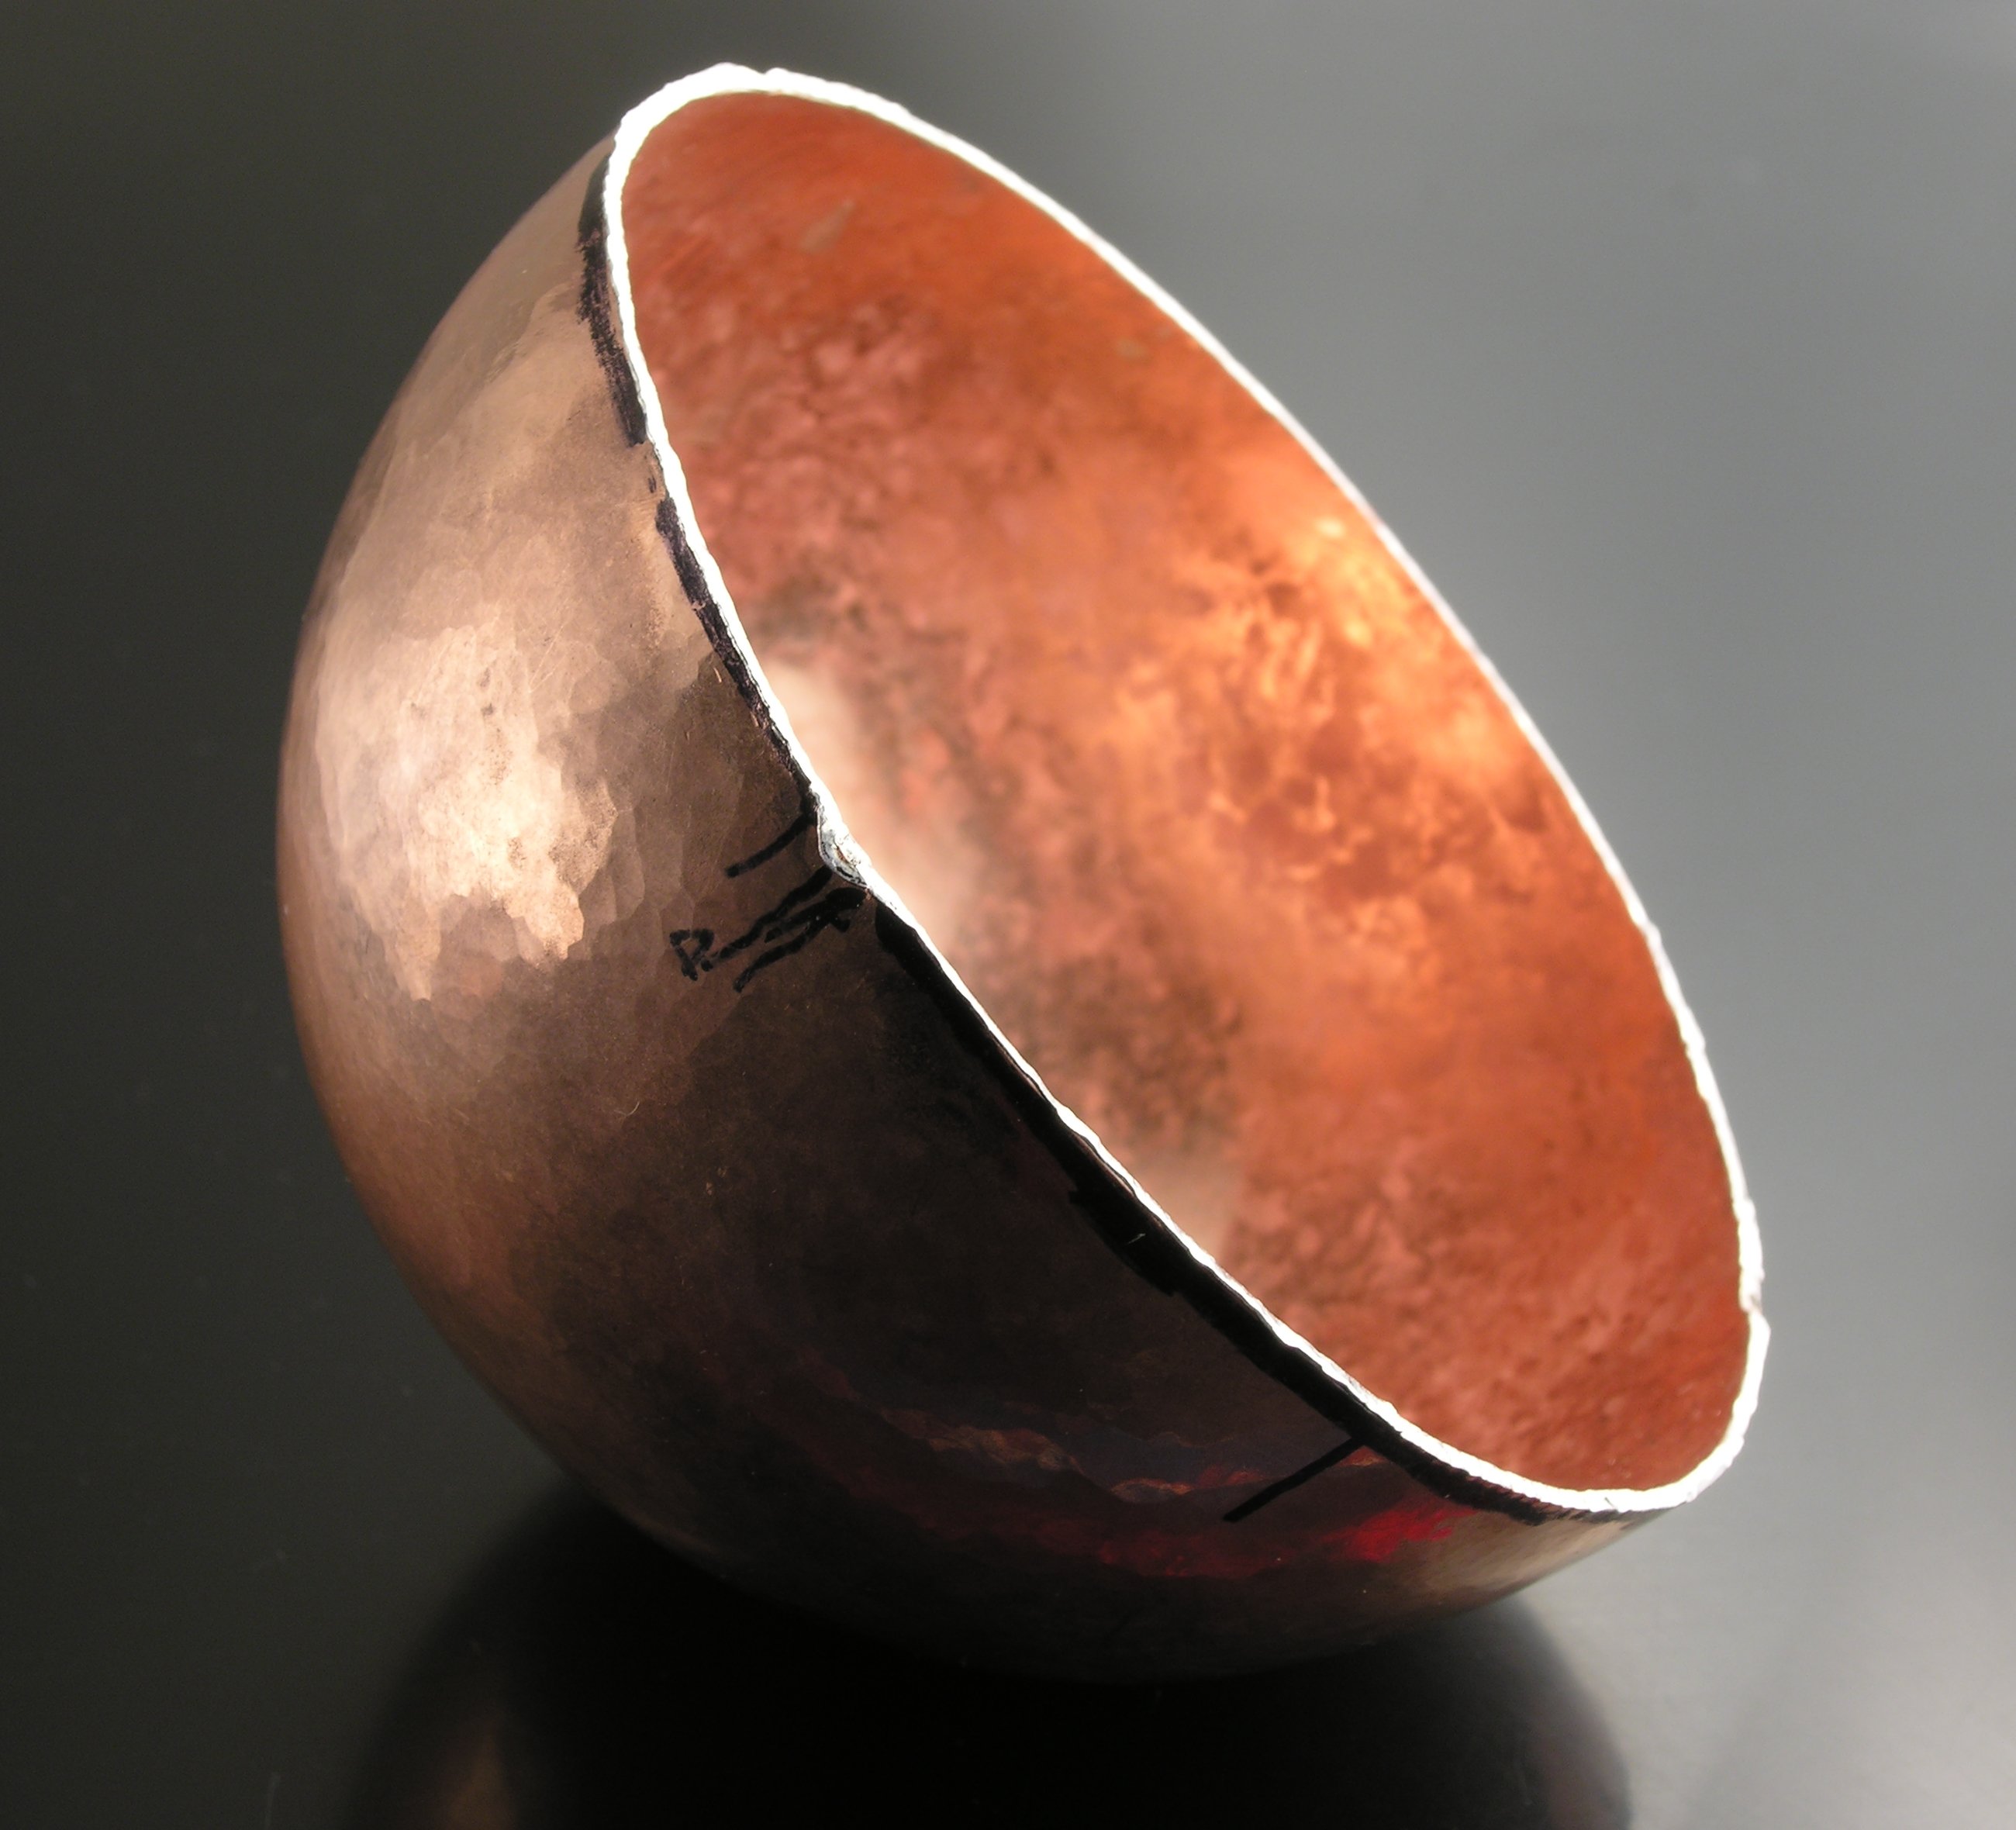
Copper bowl, with sterling solder and fine silver on rim. 3-15/16” diameter, x 2-1/4” high.
Eventually, I got to the point of starting to shape the piece on the ball-shaped stakes: the school has two, which I would say, at a guess are roughly 2-1/4” and 3” in diameter. So, what happens if you attempt to wrap a piece of sheet copper more than halfway about a spherical object? Right, it doesn't come off. In between raising and annealing, I banging at the edge with a cross-peen, supporting it with the sandbag, but the lip didn't acquire the zigzag daggy look illustrated in McCreight. I liked it, though, and rationalized that it would be less likely to slice my finger while using the box.
Having realized that I could not make a three-quarter sphere around a ball-shaped stake (and unwilling to use other, more complicated methods) I moved to the smaller sphere. In the process my bowl became some sort of curved shape not perfectly half round. During this time, A. was making a 3” copper sphere, and telling me I should work to a template. No thanks, I replied, I was having a hard enough time just trying for an even, flowing line. After the piece was the shape I wanted it—and I got to the point where I did not believe I could make it better only worse, which is my usual cue to stop—I started planishing. I know at some point I was rotating between the standard stake (chosen because it already had dents, on the theory that I might accidentally add one or two more) and the ball stakes, often with those wrong sounding hammer blows.
I did this “bad hitting” during open studio, when the instructor wasn't around. Since I wasn't actively abusing the equipment (only my piece) I was kind of sad that I felt this was necessary. At the same time, it must be incredibly frustrating for people to keep doing something the wrong way, especially after you've told them five times how to do it the right way. Unfortunately, I've never in my life learned how to do anything the right way quickly; I spend a lot of time struggling. Even now, when planishing, the spot the hammer hits is generally to the left or the north (up) from where I expect it.
The bowl was a large enough piece that I had to put it in the big vat of cold pickle, which meant that I had some time to kill after the annealing cycles.
Part II. Leaves.
Originally I was going to put a rejiquar on the lid, to refer back to that other, failed vessel (I put a hole through it), with curvilinear viny tendrils to act as supporting legs. Any number of plants put forth curlicued tendrils, but the ones with which I'm most familiar are pea plants, which I photographed fairly extensively. Since it's winter, this convenience made them an obvious choice, since I didn't think I'd be able to go out and get live reference material. (As it turns out I was wrong:) Besides, the most glorious metal bead I own, a gorgeous Anne Choi, has pea pods on it.
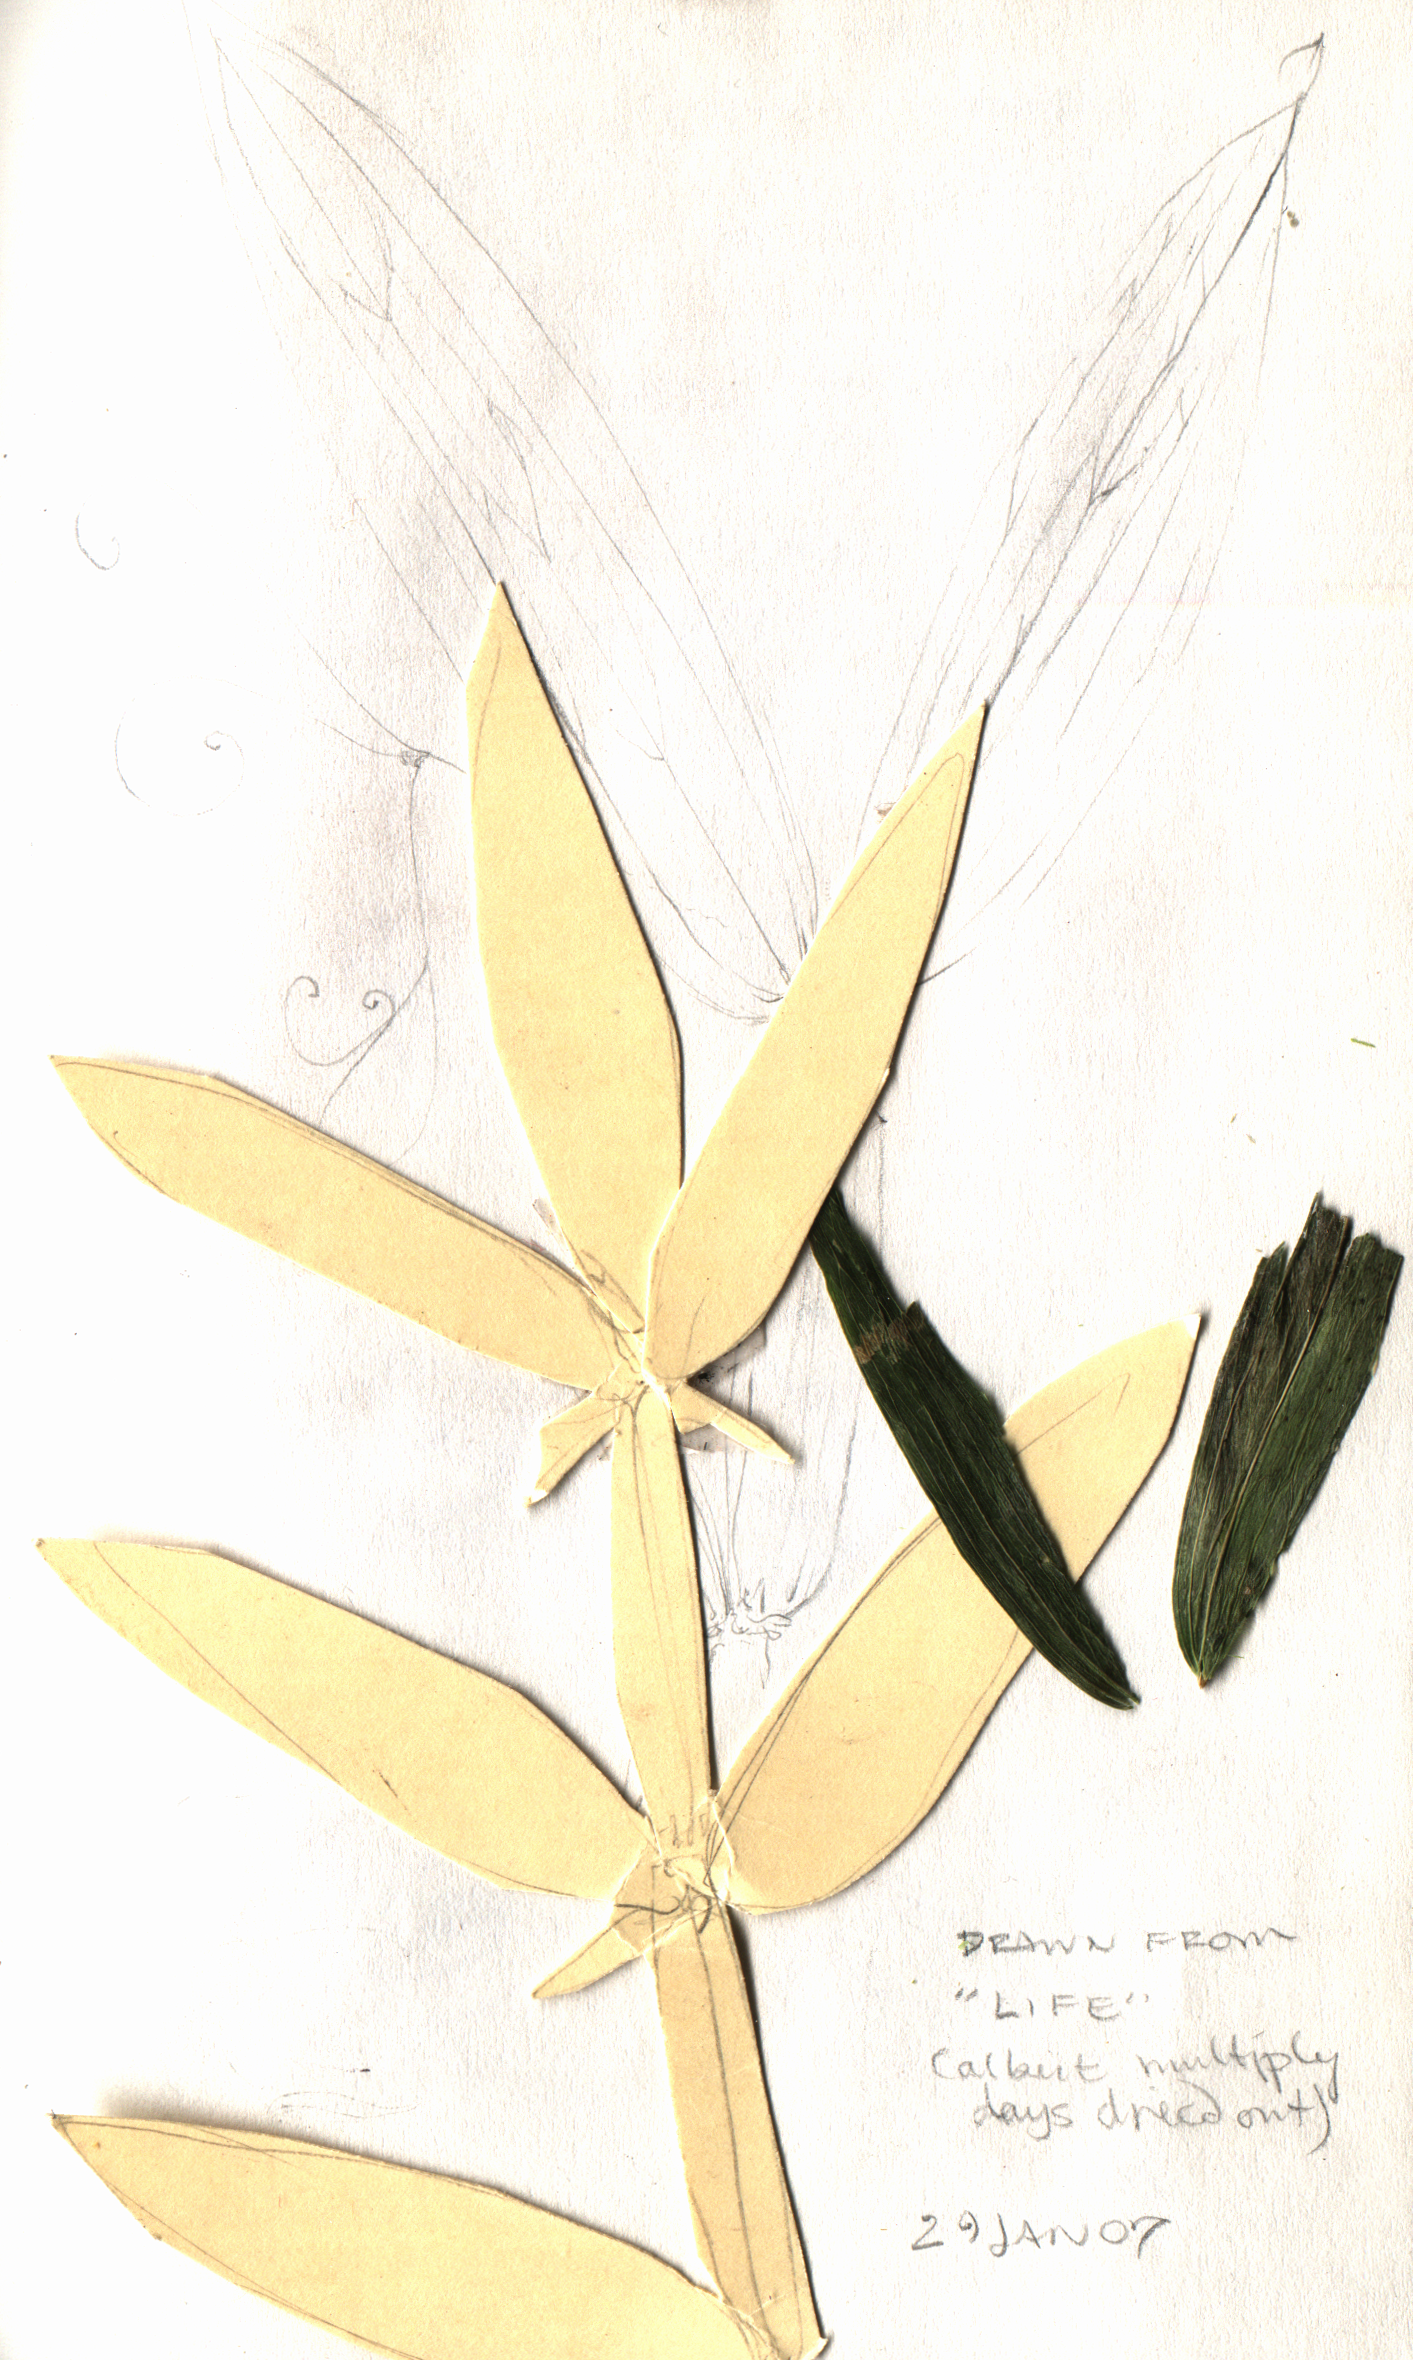
fragment of pea leaves; template drawn from same; careful sketch from same. I made drawings over and over, until I was able to reproduce the plant's basic form from memory.
Originally I had intended for the lid and the supporting leaves to match, making both out of silver. I decided to make some practice leaves out of light guage copper, so they would be easier to form, chopping them out with shears. They didn't look very good. I made a paper model out of a file folder. It didn't look very good either. I had discovered a pea plant actually still alive, so harvested some of its leaves before the deep cold killed it off entirely. The instructor suggested bending my models around the stake, rather than the bowl, which was getting terrifically scratched with my efforts. This was a huge help, as the project was stalling badly at this point.
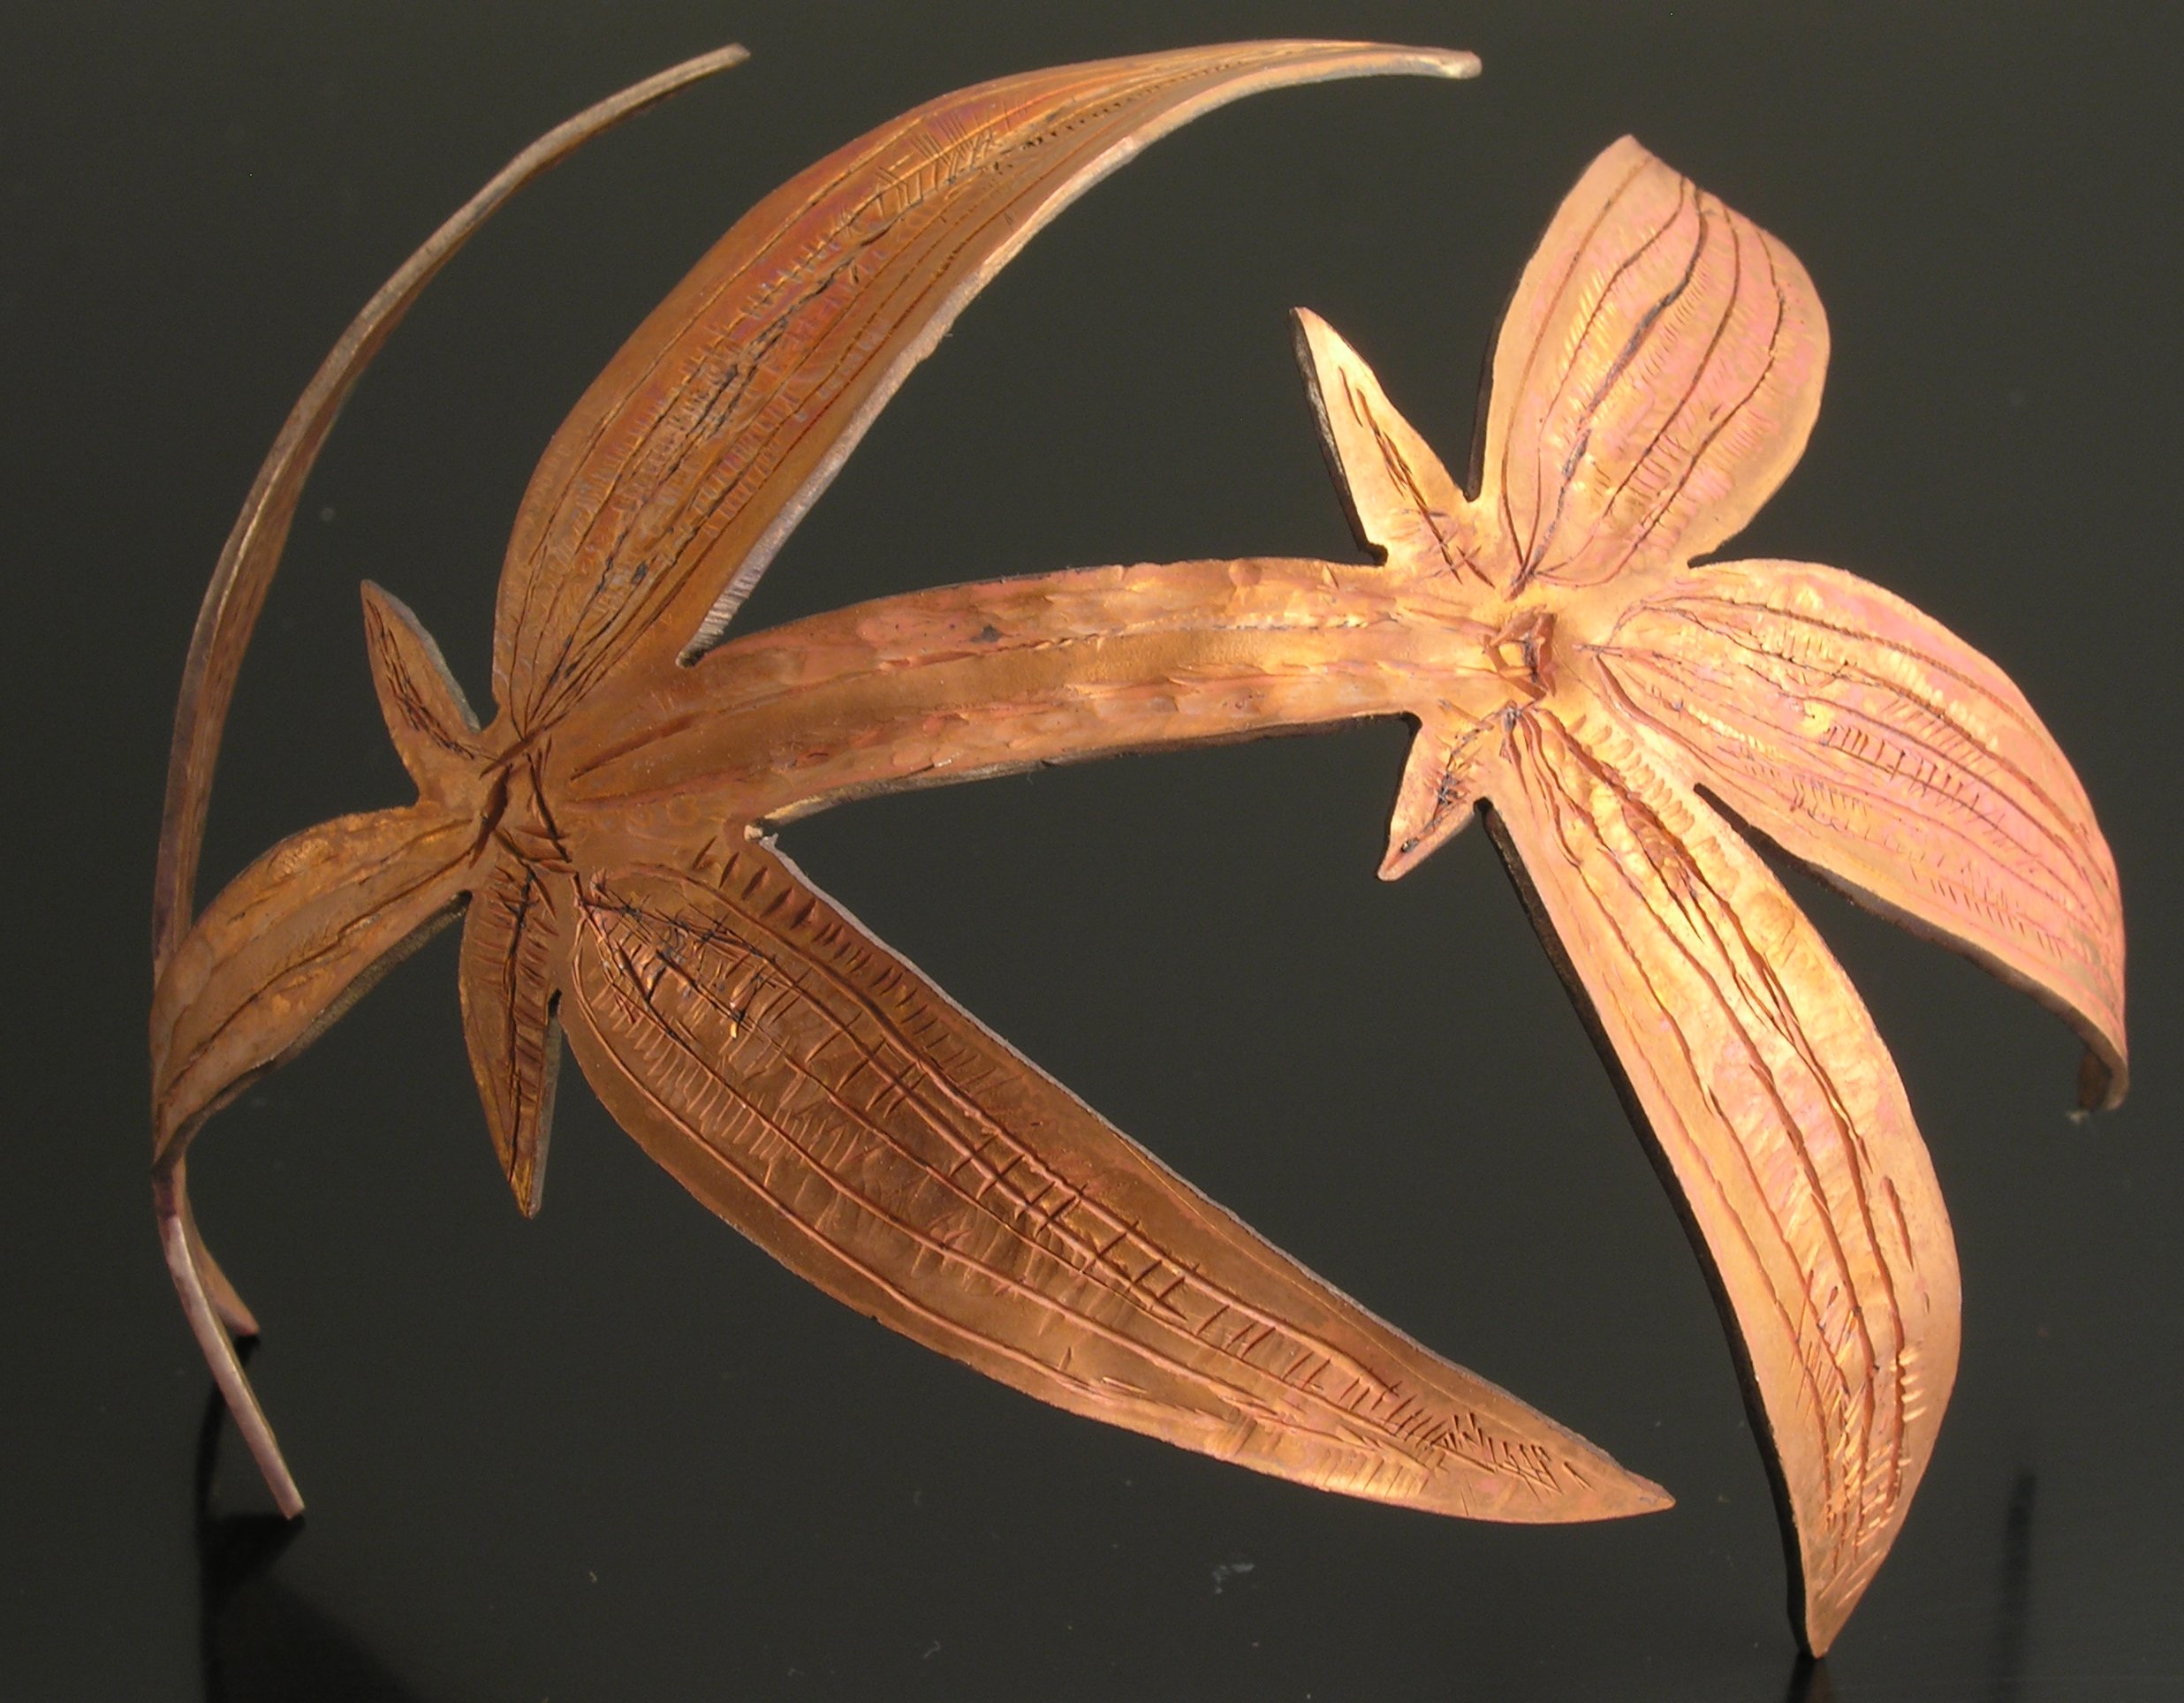
Bronze leaves. 18gauge red bronze, 4”x2-1/2x3”. I love the color these are, just the way they are now, and hope to keep some portion of it.
I wanted the leaves to fit around the bowl fairly closely, yet prop it up. I concluded I was angsting too much over the cost of silver and decided to do them in bronze. The yellow metal would still be pretty against the green patina I'd planned, and it's a real color that leaves actually achieve. By this time I'd added the gold leaf lip to the mix, and figured one more metal would be fine: the gold lip would counterbalance the non-preciousness of the leaves, just as 3–4 sheets of gold leaf (which, by the way, is not that terrifically expensive—I use exactly the same 23k leaf in my gold leaf and abstract beads—increased the perceived value of Mr. Huang's vessels fivefold.
Interludes.
In the meantime, I'd been practicing other things. I'd learned how to use a circle punch. I practiced sawing, graving and repousse with a saw-pierced bronze rejiquar, meant to be part of a lidless box. I'd learned why you repousse first and then saw with that rejiquar (though not before I'd already made error of sawing out the second batch of bronze leaves).
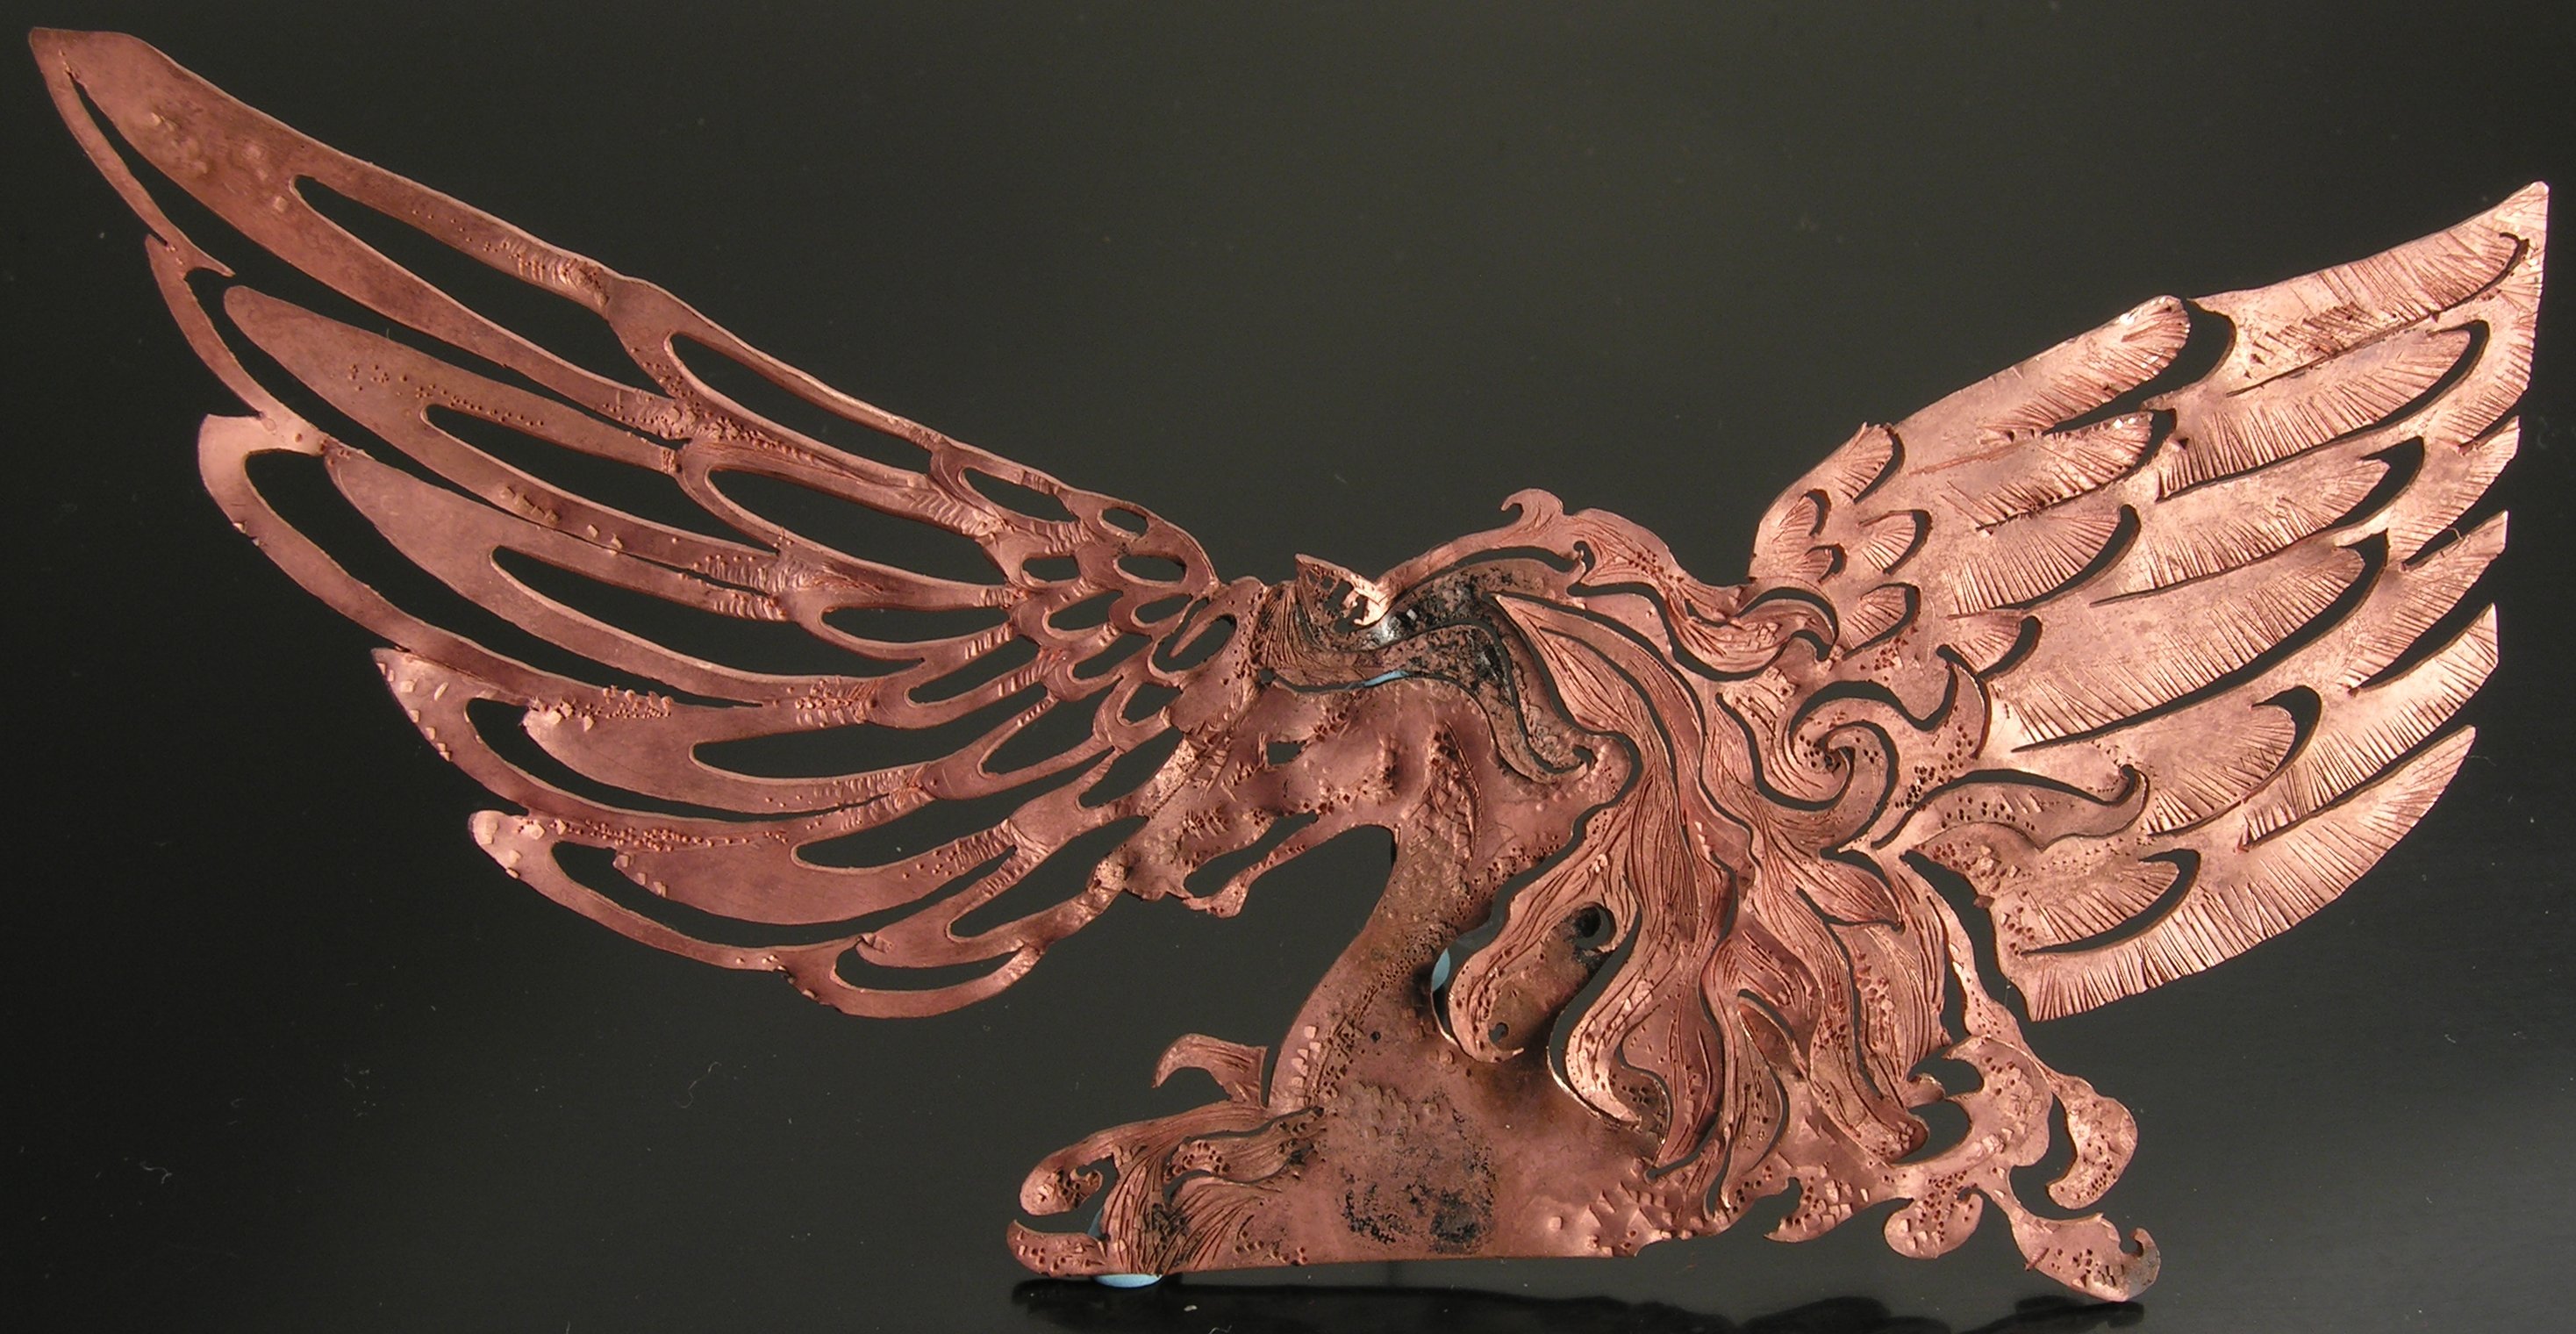
7x4”, saw pierced bronze. I wish I'd had more time to style this piece: propping it up initially revealed all sorts of interesting shadows, which I was unfortunately unable to recreated for the final shot. Again with more time I would've gimped out the handitac.
The techniques I worked out for the rejiquar's feathers I transferred to the pea-leaves. I cleaned up my punches from Fike, and made three new ones and learned how to use the sandblaster. But now the deadlines were looming, and I didn't have enough time to practice soldering disk beads or the rejiquar box together. Owing to a misunderstanding of the instructions in McCreight's Boxes and Lockets, from which I pretty much wholesale lifted the instructions for the finger-joint hinge, I thought the hinge edges would show, and therefore wanted to make them of silver, to match the lid. So I gathered together the silver scraps that have been piling up for the last decade and more, and proposed to make an ingot which I would roll down to the 14 ga.
The instructor recommended I remove any silver with solder on it, so I sorted the pieces, and made my acquaintence with the schools oxy-acetylene torch, an old victor which is even more of a pest to light than my meco. I practiced pouring an ingot using the “bad scrap” with some copper added, spending a ridiculously long time calculating how much to add to bring it up to 10% copper or so, and fiddling with various old scales to weigh it out. That ingot was not particularly successful, as I failed to pour it smoothly, and ended up in two parts. (Or mix the copper in as well as I might have before pouring it.) I plan to reticulate these, which I've rolled down to 20 gauge. (Also I plan to buy one of those wheel gauge thingies, they're handy.)
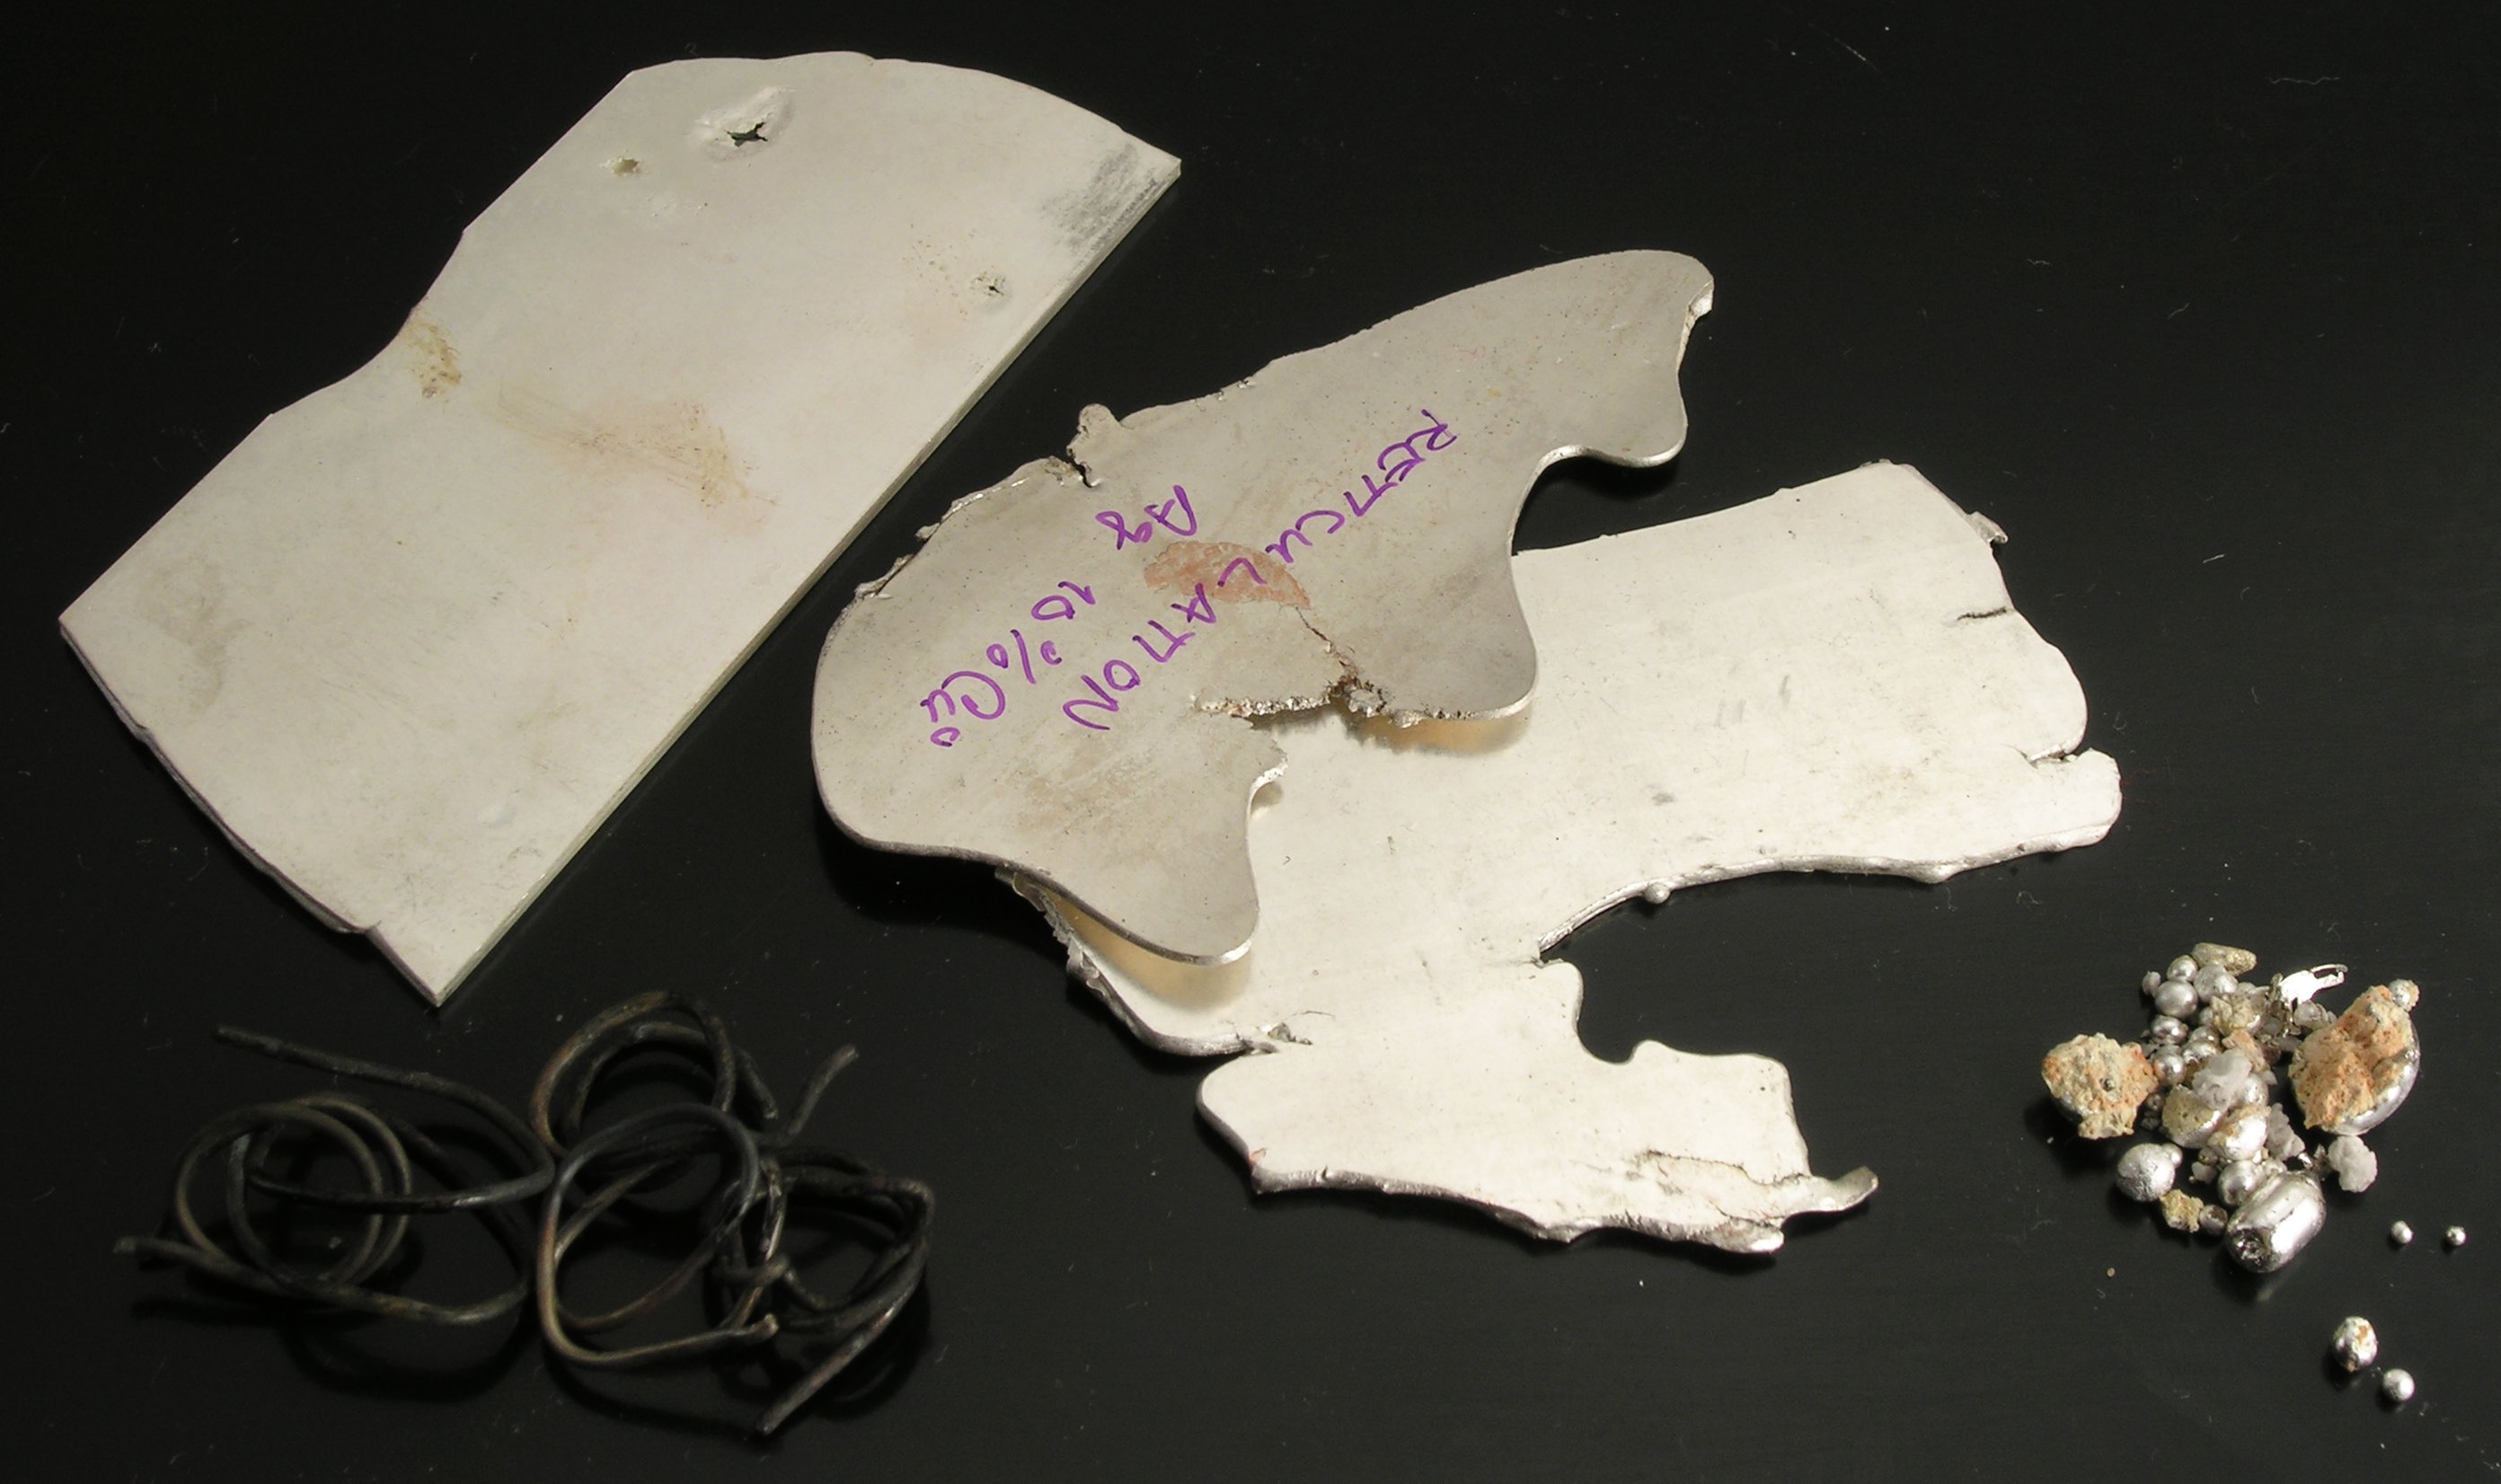
Silver ingots. The piece on the far left is sterling, what remains of the 14ga piece I made for the hinges. Note voids and flaws. Nevertheless I was able to get the equivalent of 1/4x6” out of it to make the hinge, so I considered myself satisfied. 1-3/8”x3-1/16”. The other two pieces, of coin silver, were from the first attempt. I plan to reticulate them, and then use them for something else—beads or clasps, perhaps. The brick crumbles and lumps are the fine silver I scavenged after pouring most of it anywhere but in the wire mold.
The second ingot came out pretty well, and I spend a fair amount of class time rolling and annealing my ingot to 14 gauge. Emboldened by this success I decided to attempt making the fine silver bezel wire I intended to braze on the lip of my bowl, to provide a clean surface on which to adhere the gold leaf. (I'd originally intended to leaf directly on the copper, till the instructor pointed out that it oxidizes so readily that I'd have a difficult time getting it on there before the copper turned black.)
I thought it would be fun to attempt making a wire ingot using a charcoal block, and the instuctor recommened the atmospheric acetylene torches; but I had a difficult time heating it up with those; besides being too timid about heating the block sufficiently; the metal sat stubbornly on top till it solidified. So I returned to using the steel ingot mold (the school has both sheet and wire molds) and the hotter torch. Not having any extra metal, I didn't practice, and ended up pouring it all over the place: it was harder to see where to pour, and the welding glasses I borrowed were darker than what I use; but I did manage to extract a 1/2” piece of fine silver made from bad PMC beads from the mold.
This I brazed onto an equivalent-gauge piece of copper some 6–8” long, which I then proceeded to take through some 20–30 cycles of anneal, oil, draw, till at last I got down to the very smallest hole. I couldn't do it. No matter how I filed, annealed, didn't anneal, the wire snapped or broke off. Nevertheless, I was quite pleased, since I'd never used a draw-plate this successfully before. In the future, if I had to draw precious metal, I would again employ this technique of making a “leader” of waste metal, since I lost 70–80% of it over the course of my efforts. After drawing the wire down, I flattened it (rather unevenly) in the rolling mill. I had just barely enough to go around my bowl lip.
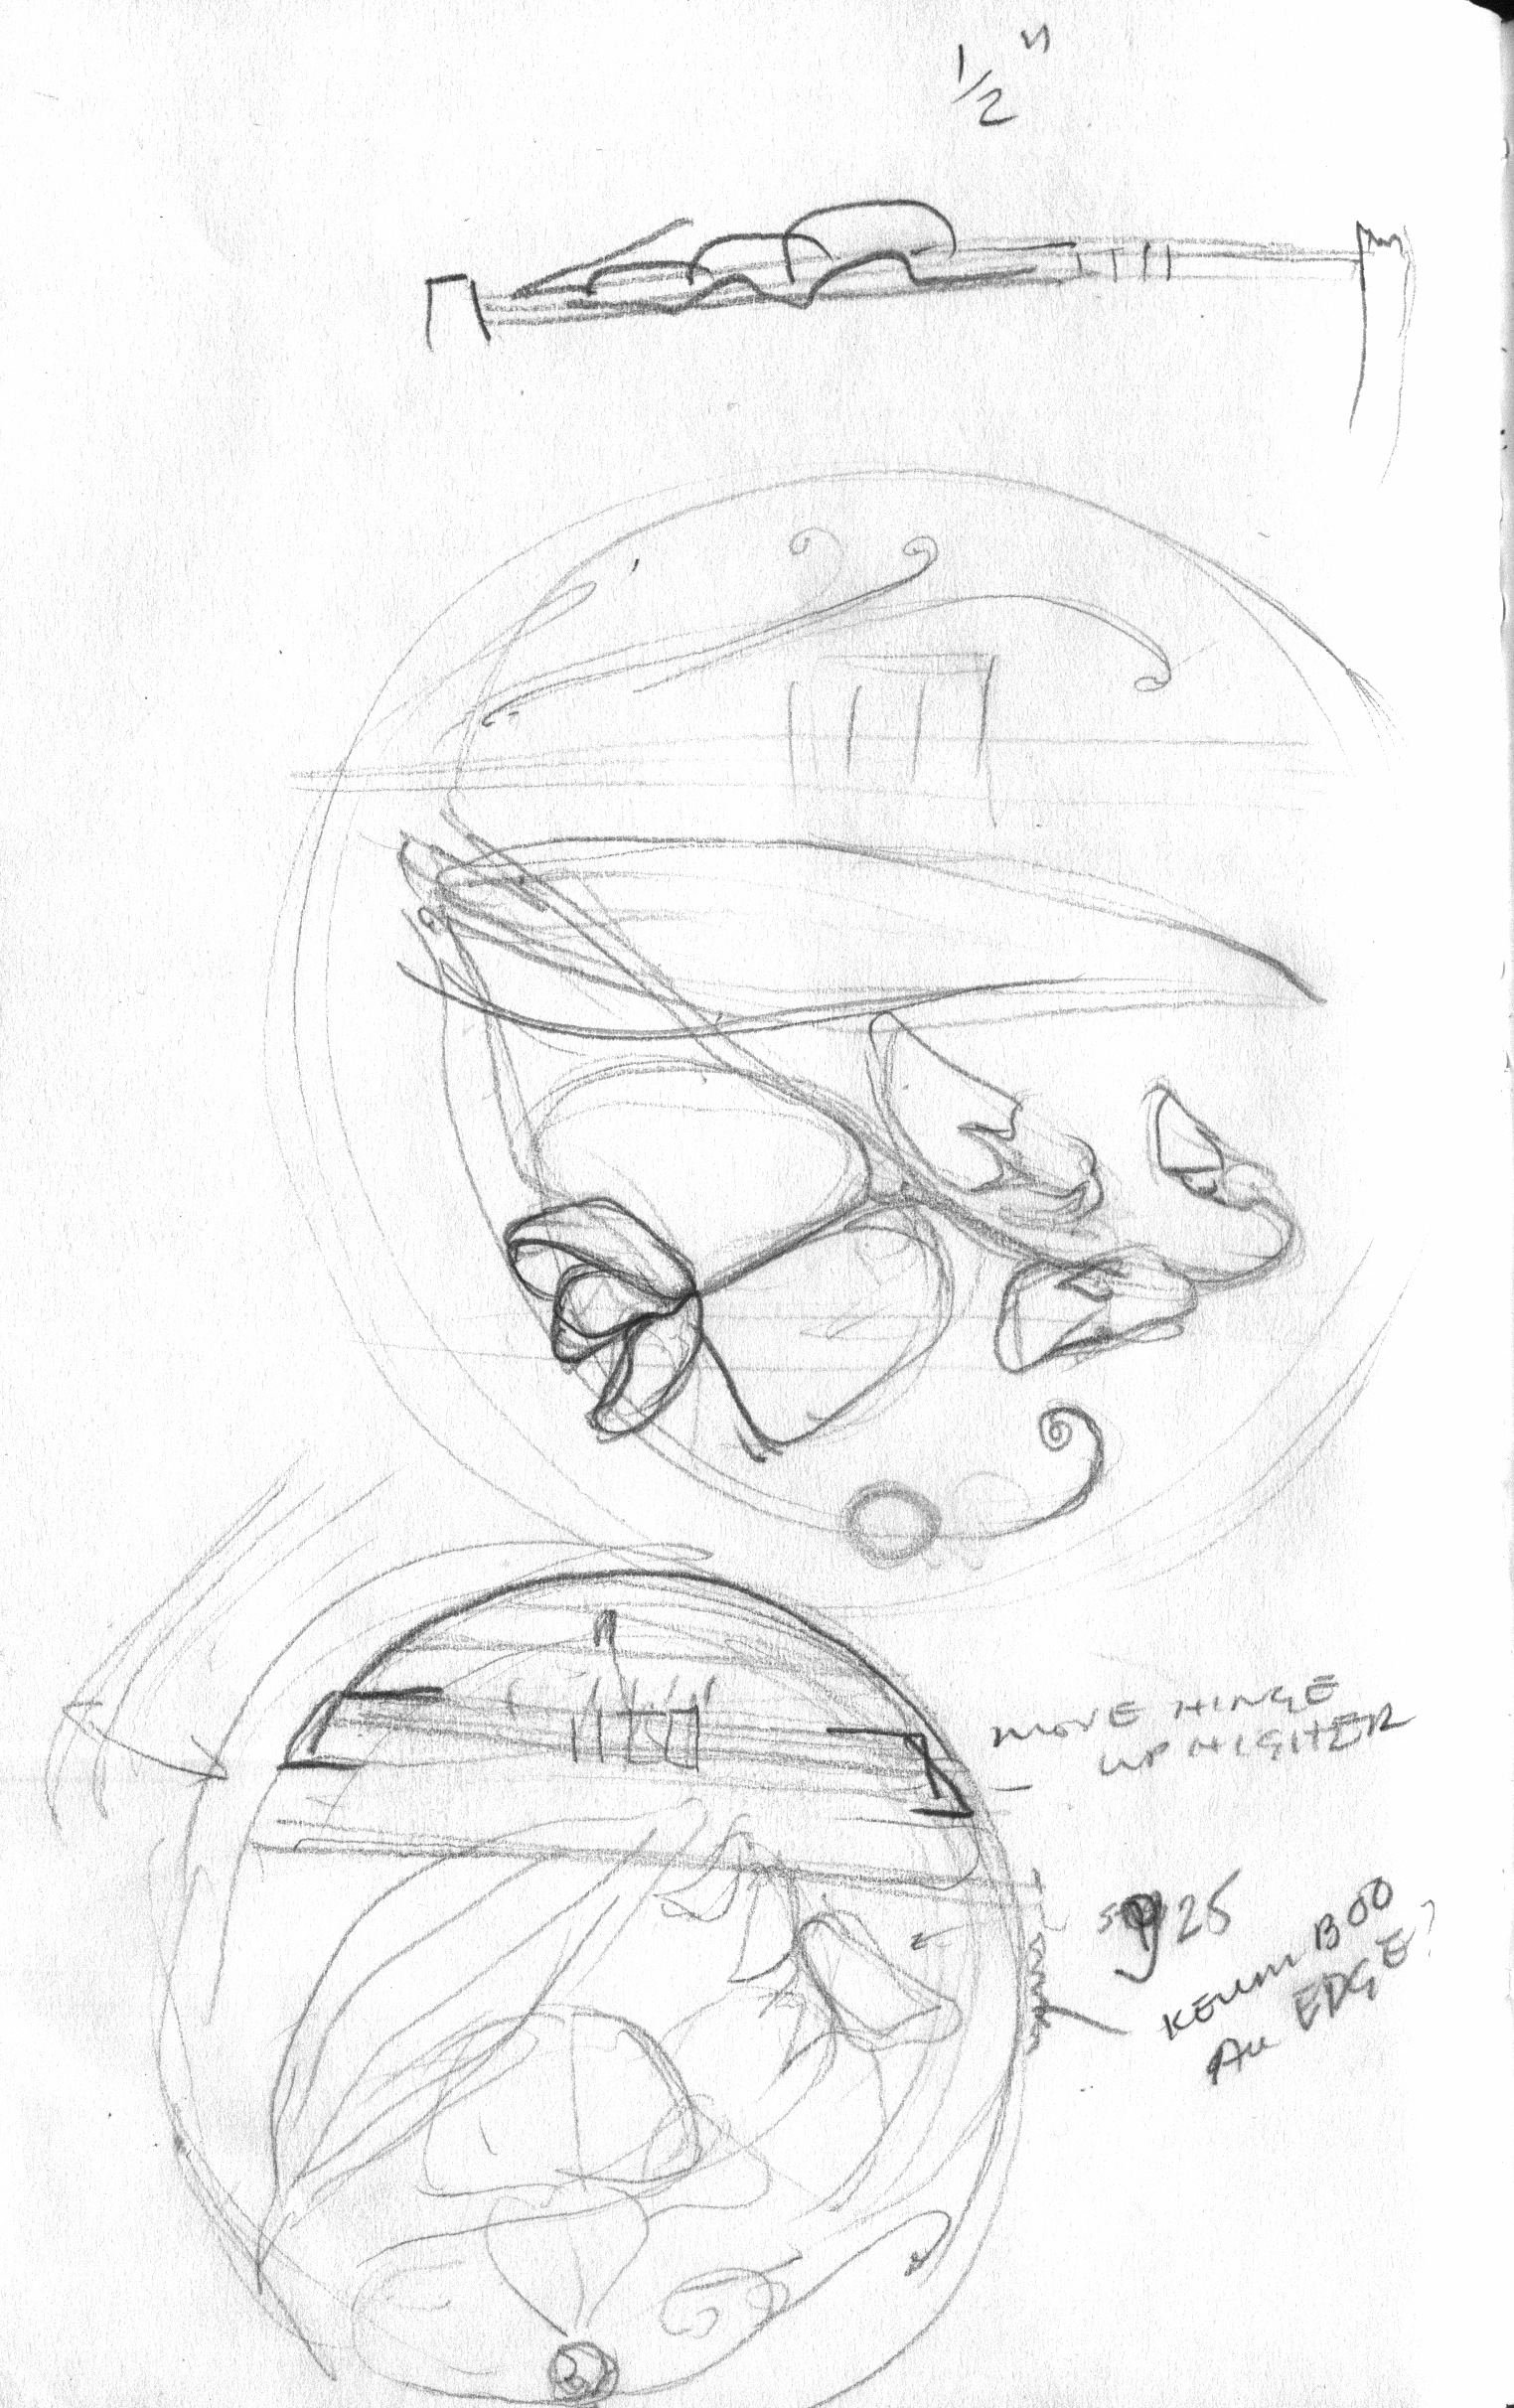
Meanwhile, I was refining the design. Note orientation of pea plants on lid, which will change.
I learned how to use the compressed air; tried using the sandblaster on glass beads, and though Shane Fero gets lovely surfaces on his boro sculptures, I only obtained the same rough, uneven and unsatisfactory surface I got using the wet bowl and porcelain media of my pin polisher. I was able to blast holes in the beads, though. And I brazed together the wizard's sterling roll-on ring, which according to the instructor is called a russian wedding ring. This three dollar ring was the first thing I gave him, and it's so thin it's barely wearable; but it was awfully nice to have something go together more or less properly on the first try, and besides its repair made a nice valentine's day gift.
Part III: Repousse
This was unquestionably the most enjoyable part of the class so far. A. wants perfectly smooth backgrounds to hir repousse, and has been making an absolutely gorgeous, drool-worthy collection of punches to achieve those ends, but I live for texture. I started by practicing on a saw pierced rejiquar, a project stalled for years because I didn't have a deep enough throated saw to complete it: it was originally never meant to be chased at all, but I'd started texturing it after I ran out of saw depth. I thought it would be nice to complete the original project (a box to hold business cards) and it could serve as practice. I'd duly worn one saw blade out and broken another; now it was time to practice repousse.
It was at this point that I discovered why it's so important to chase first, then saw: the pitch squeezed out over the numerous saw cuts, and though this formed a better key (critically needed because the pitch was in such bad shape) it made it difficult to get at the edges. I also read up a bit on the subject, and decided that cleaning up the punches I'd made in Fike's class might be a good idea, so I sanded the sharp chisels and polished all of them, which did seem to help, and ground off any serious mushrooming, which David Huang said could cause them to crack. (Fike also mentioned this, but not the part about mushrooming being the inevitable result of using punches—for years I thought I was doing some wrong!) I also reshaped my rectangular and triangular punches; and made 4 new punches. One was a semi-circle/sickle shape which I didn't use much because it remains to be annealed. The second two were a sharp awl (because I couldn't find my old one, and the school didn't have any pointy enough) and very teeny rectangle—too small, really.

Chisels. The ball punch, initially covered with rust, was my introduction to using the sandblaster. I haven't figured out how to reshape it perfectly round, yet, which is holding up this fixup. It's 3-1/2” long. The old chisels are shown on the left, the newer ones, made from masonry nails, on the right.
The last, which I used a great deal in the pea pod piece, was another chisel, slightly rounded. I already had three of them, but found the assortment helpful. A. recommended that I remove the head of the nail, and give it a cornered rectangle shape at the head. This is the punch into which I put the most time, but I never really spent what I would've like to make it a handsome tool. Nevertheless it looks better than the others.
Now finally ready to begin on the real piece, I incorporated the techniques I'd developed years and resuscitated on the bronze rejiquar to repousse pea plants on the lid. As with the leaves, I'd made many, many sketches of pea plants, particularly flowers, till I could nearly do it from memory, though I used my sketchbook as reference. Transferring the design using carbon paper didn't work very well, as it didn't stick to the silver.
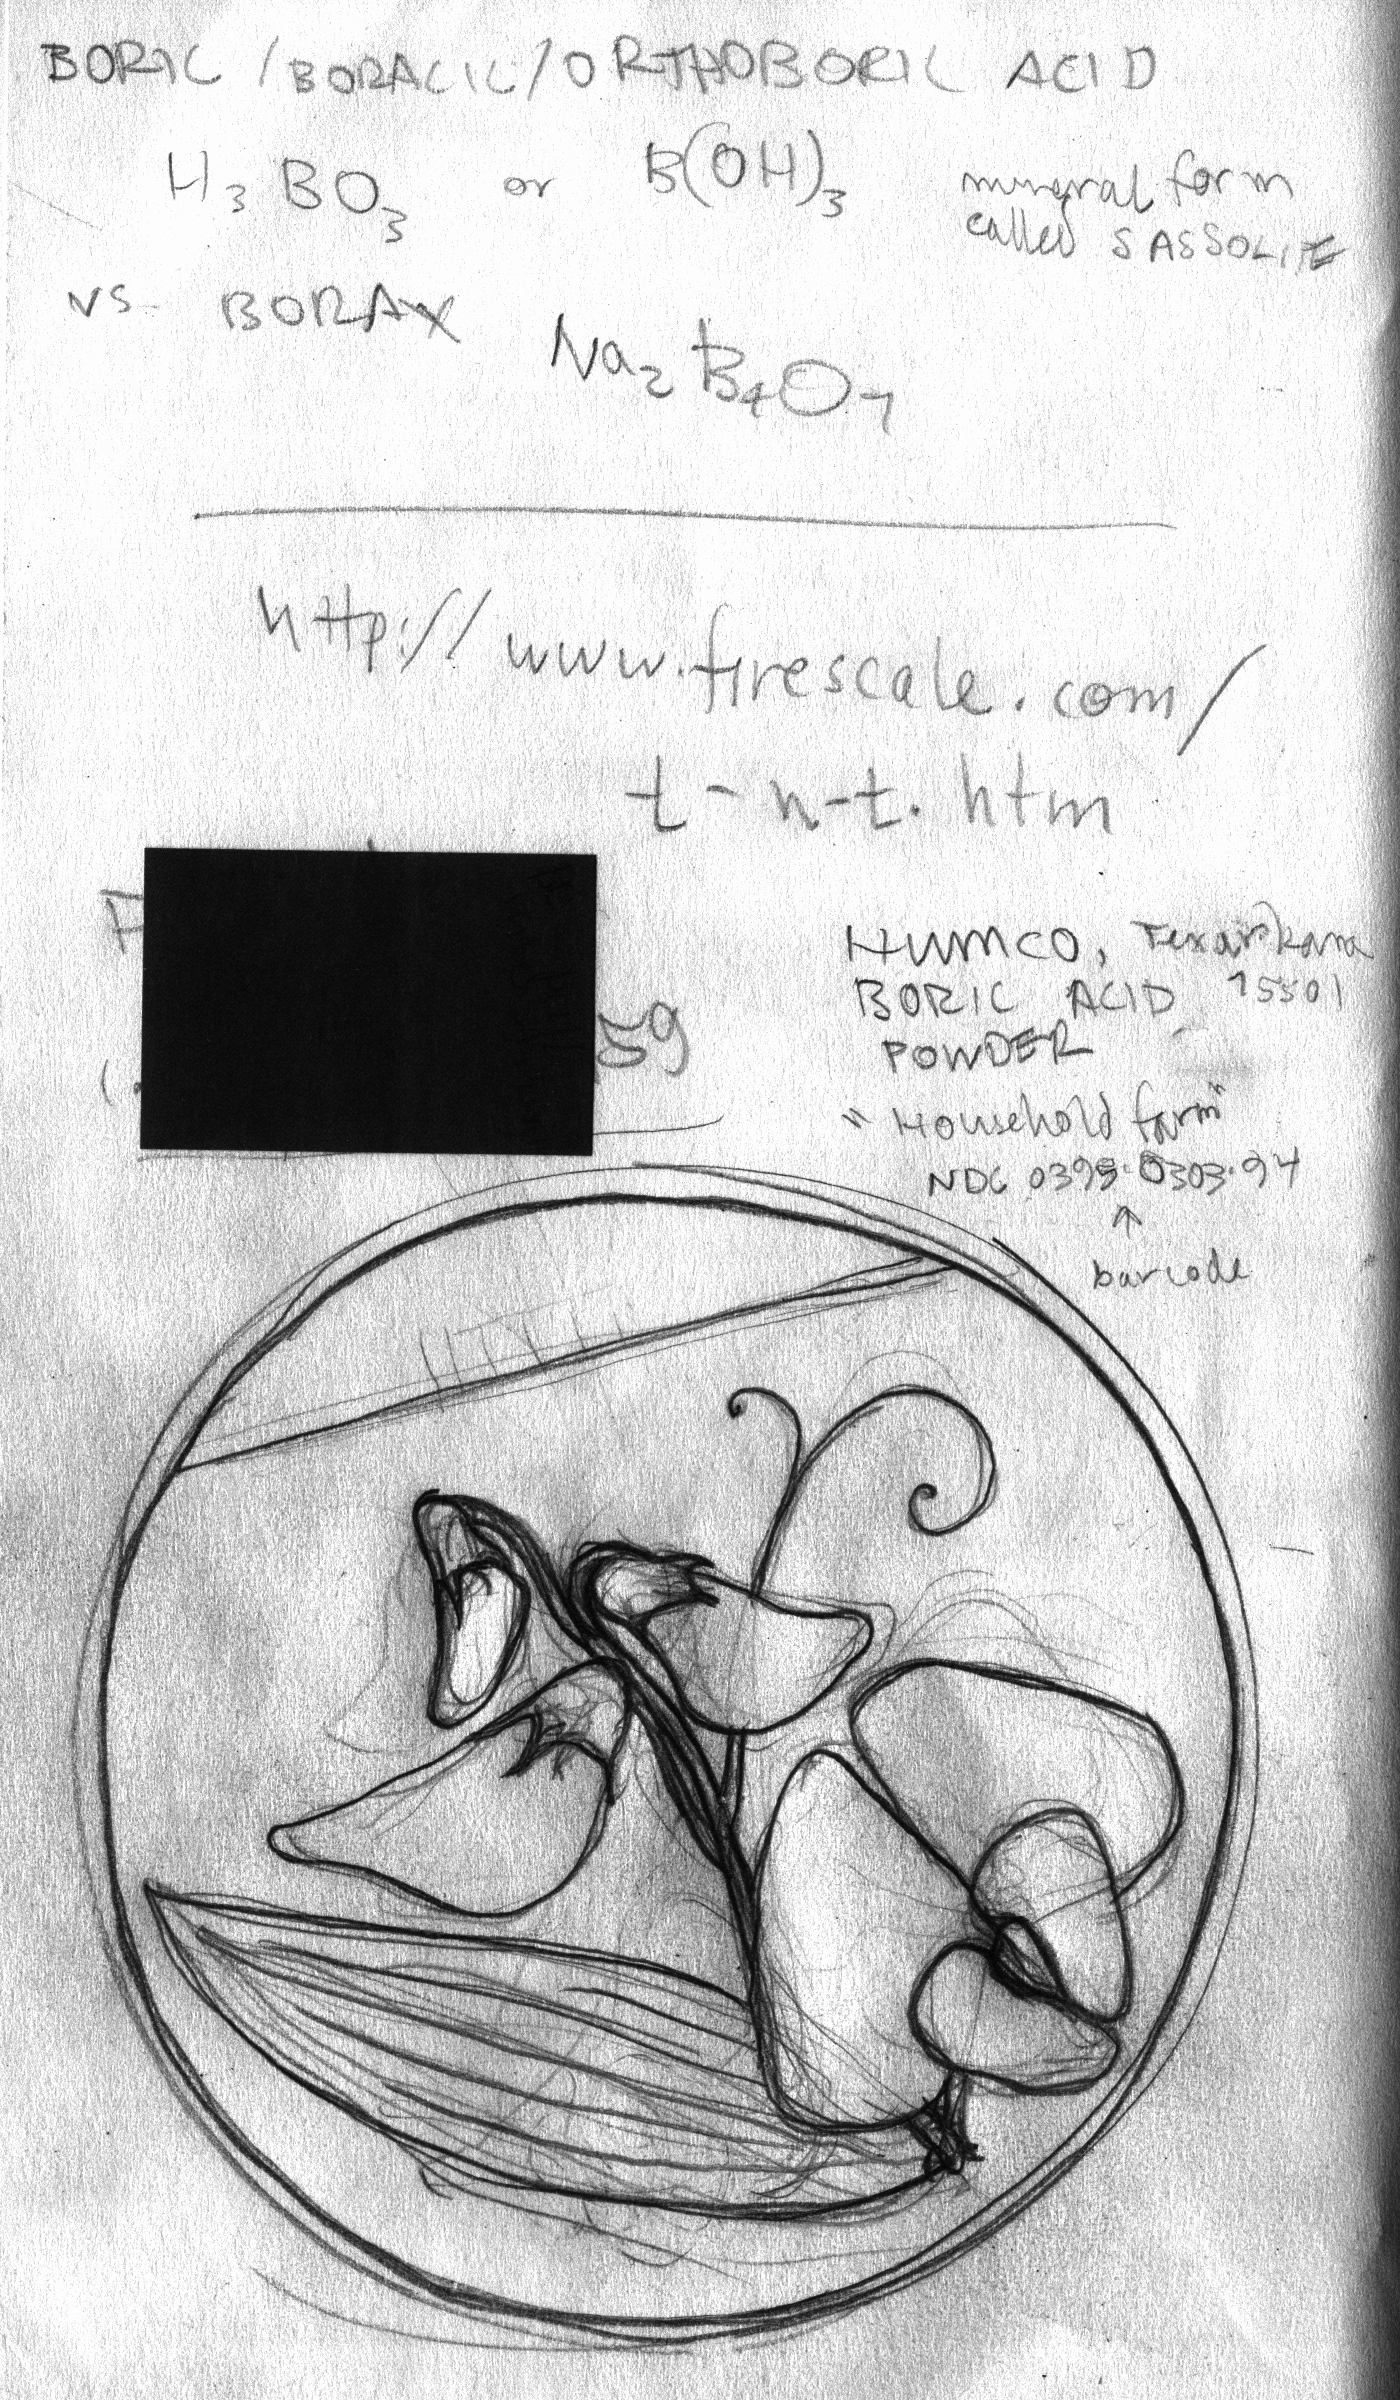
Sketch for lid design. Note that plant (as well as the drawing the page, unfortunately) is rotated. This got lost in the actual lid. The website listed is where I found the information about prips.
The instructor recommended double sided tape, and I tried it, but didn't like it. I went back my dimly remembered method: I drew the design on paper until it became the way I liked; then used the carbon paper to transfer it to tracing paper, which I spray mounted onto the silver. One of the punches I'd made for the class was a simple awl, since I couldn't find mine and the school didn't have any with sharp points: I used this to scratch through the design and transfer it to the silver, reasoning that the repousse would hide the marks, as indeed it did.
But even a square with corners turned down still popped loose annoyingly often. A. recommended fresh pitch on top of the old. This seemed like a reasonable compromise between struggling with the bad stuff and throwing all of it out. Interestingly, this student also told me that people put bolts and other heavy metal objects in the bottom of their pitch bowls to add weight. Somehow that made the idea more acceptable as well, since obviously adulteration is a perfectly acceptable technique. So I tried it. It worked much better, but then the whole new layer of pitch popped loose from the old!
So then A. recommended gouging out some chunks of the old stuff to form keys, and that seemed to solve the problem entirely. I also put a little new pitch on each time, in all cases being very careful to slowly melt the pitch, as oppose to scorching it, which had caused the problem in the first place.
Working with silver, as opposed to the copper and bronze I'd been using up to this point, presented a couple of challanges. One was that I had a very difficult time telling when it was annealed. A 5” square chunk of 18ga silver does not readily bend in the hand: I tried turning out the lights, and even painting the center of the piece with flux, which is supposed to turn glassy at annealing temperature, but the metal still did not seem to be annealing. In fact it was, but I didn't realize it; my other difficulty had to do with that perennial curse of silversmiths, fire-scale.
Firescale, the black crud that appears on the surface of sterling, is copper oxides; and they'll form underneath the surface of the metal because the oxygen will actually diffuse through it during torching. The boric acid I'd been using to fight this off was rapidly running out; meanwhile, research suggested that the magic fix to my problems would be something called prip's, a mix of boric acid, borax, and sodium triphosphate. I'm most thankful to the local ace hardware, which is just about as close to the perfect local hardware store as you could imagine—small, friendly, remarkably likely to have the stuff you need, and a very knowledgeable and helpful owner, who went to considerable trouble to locate and purchase for me some 99% boric acid, aka old fashion ant and roach poison.
The other two items I found at the local meijer's, which I'm happy to report still carries real, as well as substitute, TSP. Though some online information suggested that this was likely not pure, I mixed a batch up according to the directions, and, contrary to the advice given on the website, stuck it in a spray bottle—which does indeed clog occasionally, but has proven to be simple enough to clean. Perhaps someday I'll locate my atomizer, but I haven't seen it for years and was never able to find a real use for it. I'd prefer to actually finally use it before buying another...at any rate, the prips seems to be working just great.
Part IV: Rim
If the repousse was the most fun, and most successful, then (at least so far) attempting to braze the thin fine silver bezel wire onto the rim of the bowl, to act as substrate for the gold leaf, was unquestionably the most frustrating. After some discussion with the instructor, I decided to coat the rim with hard silver solder. I started by using the atmospheric acetylene torches, which most students use more than any other; and managed to more or less, after several iterations, cover the rim with solder, and even tack the wire down in a couple of places. I did at least learn how to make little home-made clamps from iron wire, which was interesting, because I'd never done that before. But overall, the process was frustrating.
Since the school has a little torch—a miniature oxy-acetylene torch, I thought I'd try that. I'd already tried using it to make the wire ingot, and thought, if I switched to my welding glasses, that I might have an easier time. I did at least feel as if I were no longer fighting the torch, since it works more like the meco. Certainly there seemed be less of that black stuff covering the bowl even before I could get it up to temperature. On the down side, I fried the wire in several places.
By this time, with perhaps 2-1/2 weeks before the deadline to go, it was fairly clear that I was not, at the rate I was going, to finish in time. A long conversation with my business partner reinforced this: this class is basically R&D for me, but real-life deadlines, specifically for BMAC/Rosen, which is our biggest venue for the year, were obtruding. I decided I would bang what fine silver had stuck to the rim down, and attach the gold leaf to the solder: I already knew from prior experience that keum boo will work on sterling, and just for kicks, tried some experiments on copper sheet. They were somewhat inconclusive, but indicated that I would probably be successful.
And if not, then my rim would just be a little more organic.
In the meantime having heated the bowl multiple times, thereby removing the temper, not to mention dropping it on the floor, I decided to planish it one final time. Unfortunately, I didn't remove all the copper oxides (since I planned on covering it with green patina, to show up the bronze leaves, and also to give the idea of green growing things) which was a major mistake. It's difficult enough for me to see to plannish under good conditions, especially as the time has come for me to get new glasses; now I could barely tell what I was doing at all. Once again A came to my rescue by telling me that a) I would plannish that nasty black stuff right into my bowl and b) it wouldn't hurt it to pickle it mid-plannish. My final planish was still poor, and whatever aspirations to eveness and roundness were definitely diminished. I gave it up, needing, under the press of a deadline now less than 48 hours away, to go on to the next phase.
Part V: Lid/Hinge
The obvious sort of hinge—a tube hinge—I discarded early on in the design process, as it would've required putting a flange on the bowl; and I wanted the lid to fit inside the bowl—partly to show the rim, but I suspect part of the reason is that my favorite box, a pewter thing with many textures that has the extra advantage over other boxes of being a gift from a treasured sister-in-law, has a lid that fits inside. (Also a touch of “gold”:) I intended for this box to sit beside it on my dresser (one reason I wish I'd controlled the size a little better, and made it smaller, so the scales of the two objects would co-ordinated better.)
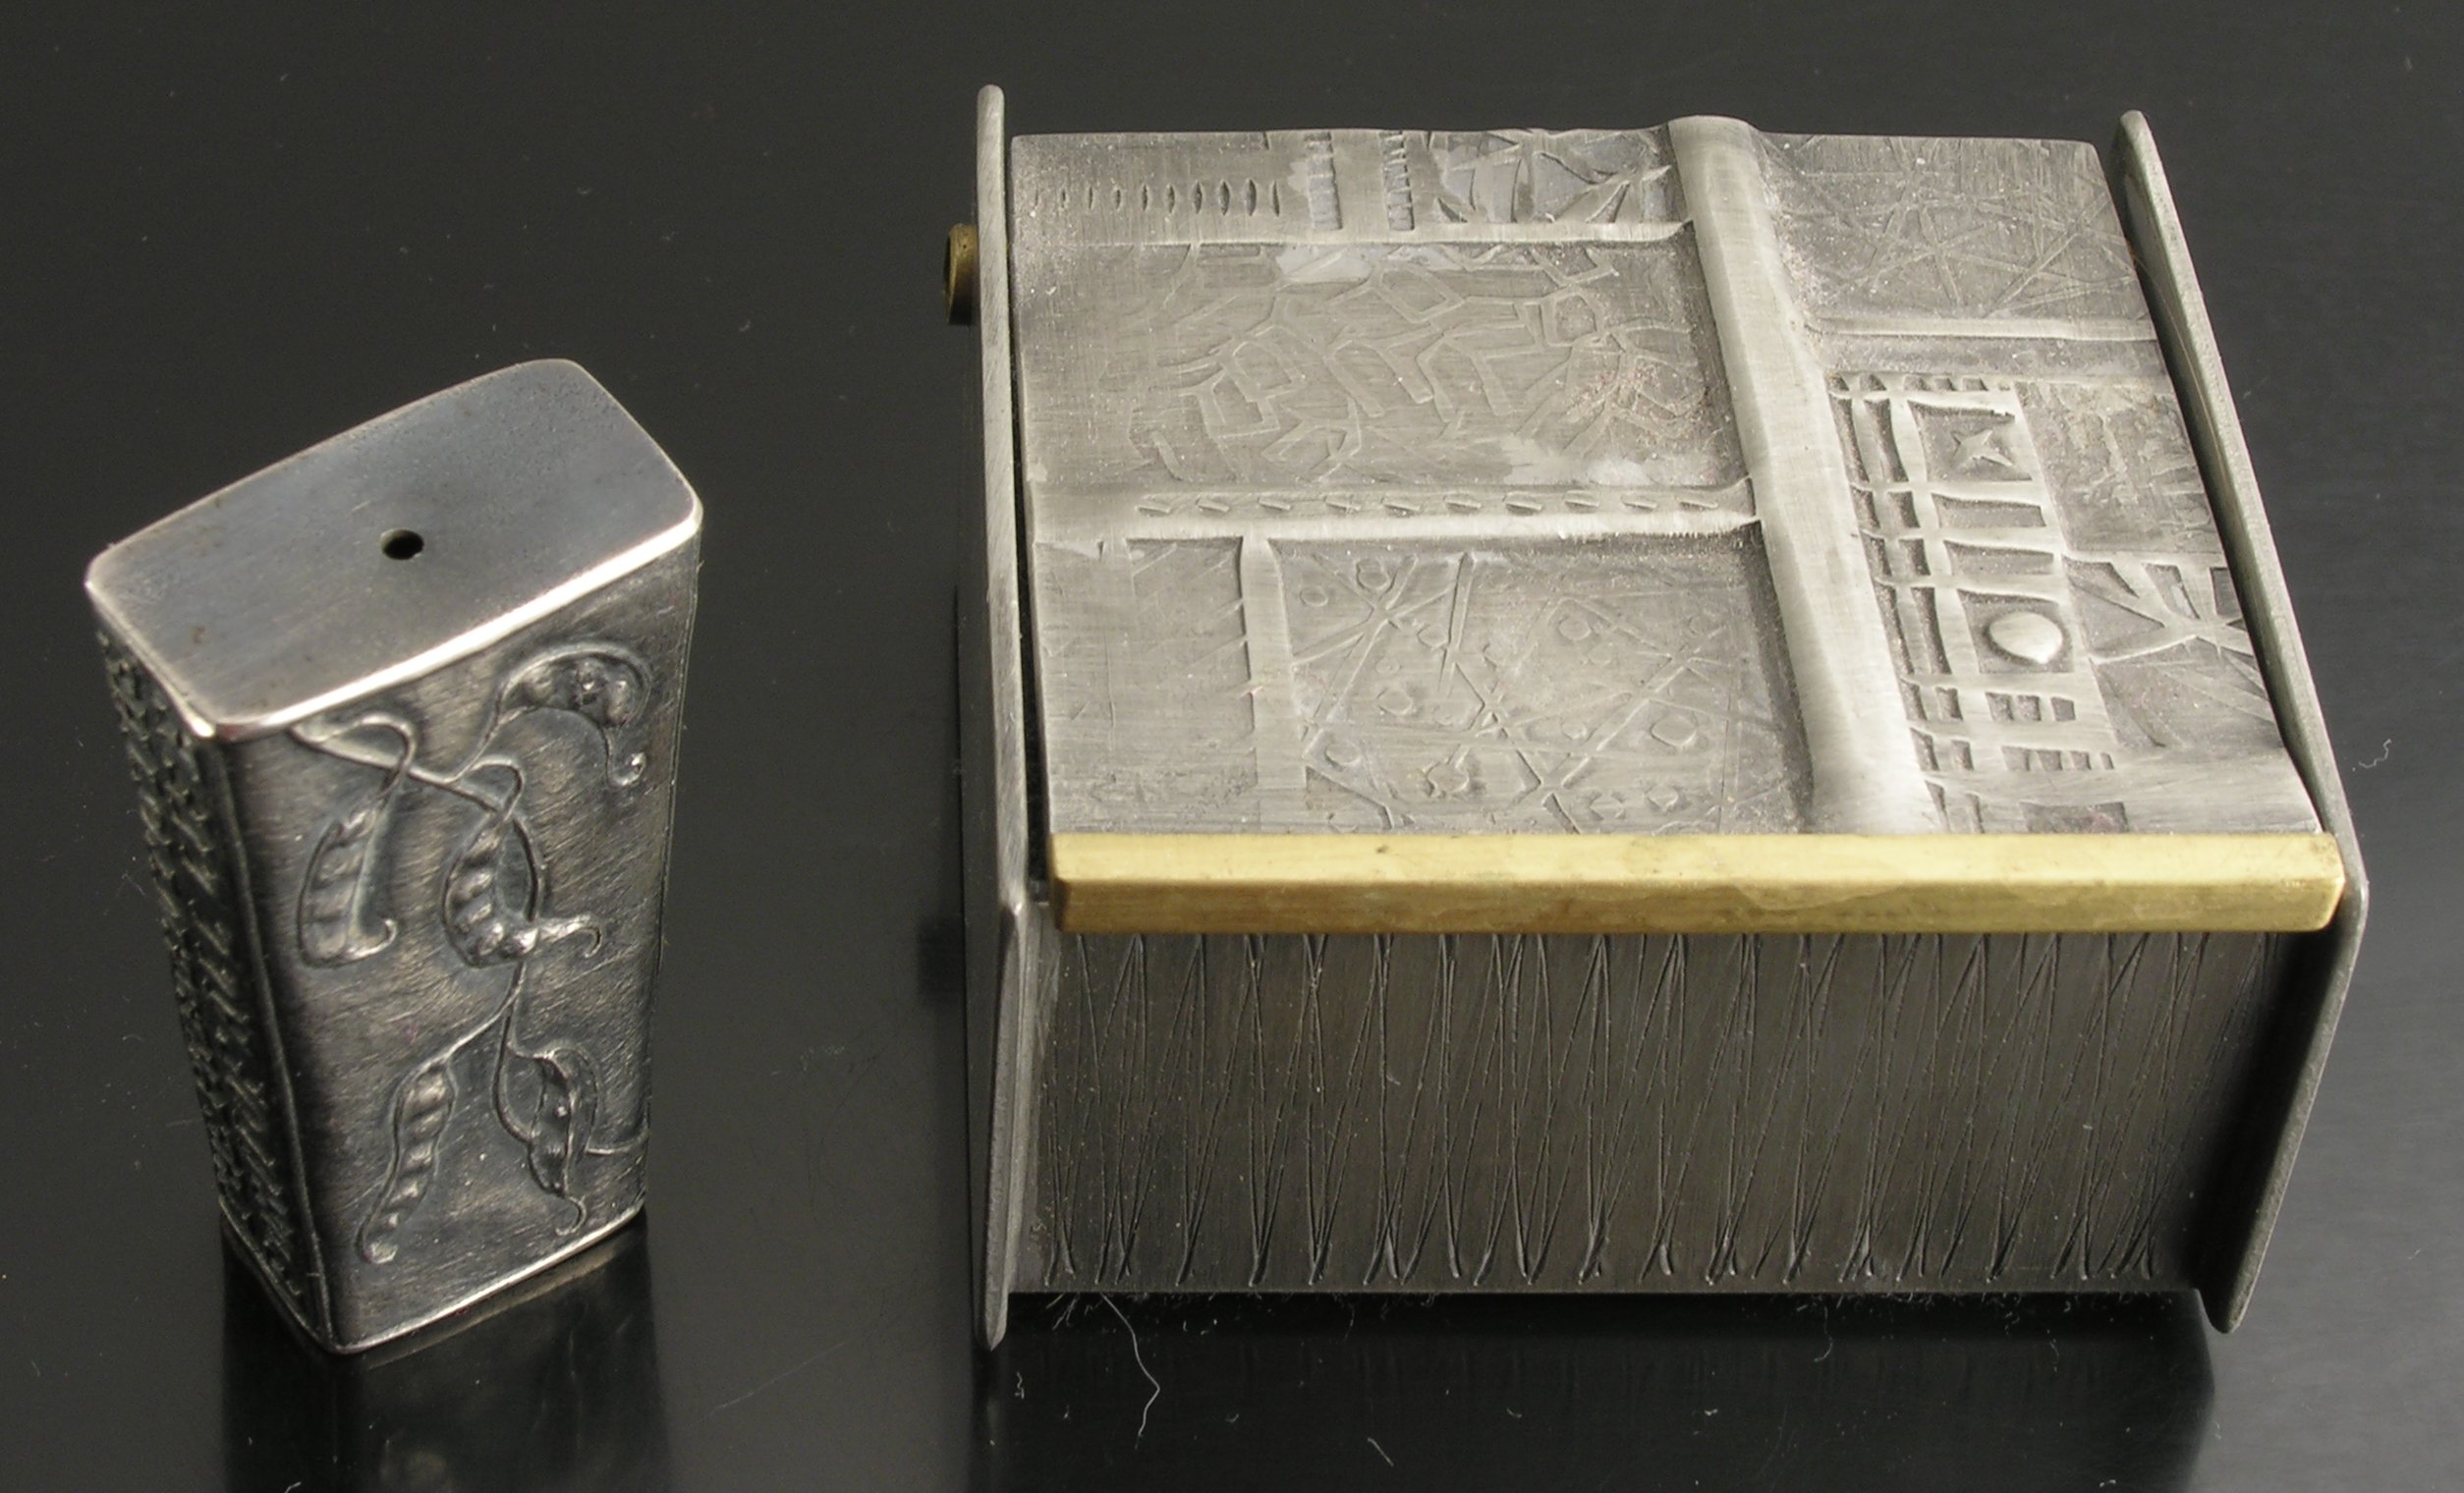
Anne Choi bead: sterling, 1-5/8” high. Pewter box, 2-1/4 x 2-1/8 x 1-1/8. Artist unknown. Two more of the influences, albeit subtle ones, for this project. I've never thought of myself so much as original, as having the ability to weave together many different scraps of ideas into something coherent of my own.
I thought about using the ‘gas-cap’ style hinge: one of the things I really like about McCreight is his utter lack of pretentiousness, and willingness to incorporate any and all ideas, scavenged from all over, into his box of tricks. It is for this reason he embraced PMC, a material I strongly suspect most jewelers still regard with disdain. (Ah, but the textures it can achieve...)
Anyway. I didn't like the hinge, not least because I was afraid I would break it over time. I was intrigued, however, by the finger-joint hinge, and the example box it was demonstrated on suggested it could be adapted to my needs. Also, I figured 14gauge knuckles would stand up even to sylvus-level abuse. I originally thought the knuckles were braised on edge to the two parts of the lid, rather than underneath it; otherwise, given the mixed metal components, I would've made ’em out of copper, or perhaps bronze for greater strength. The upside is that I successfully poured an ingot. Successful for me, anyway.
In order to space the knuckles the correct width apart, McCreight suggested bending a piece of 1\4x2” of metal around another piece of the same gauge; and then soldering a 1” piece onto a 2” piece to make a sort of T, which again could be folded around two scraps of the same gauge, yielding a U, and a U with an upright bar in the middle. These were to be soldered to the undersides of the two lid pieces, and then the curved parts, which were to hold the pieces the correct distance apart during the soldering process, would be sawn off.
Well, except that there's thing called spring back, and so my pieces were not quite the correct thickness apart. Not only that, during the sanding and adjusting process, I broke the solder joint on the 3 knuckle hinge. But I did at least manage to make, and sand the pieces relatively square and true. Having encountered and really disliking the chatter when using the somewhat dented metal plate reserved for this purpose, I swiped a page from one of the Fine Woodworking articles I'd read on sharpening, and cut out a piece of sheet glass 8-1/2x11 (to match the sandpaper size) and used that instead, after wet-sanding the perimeter, of course, to remove the sharp edges. I found it much less frustrating.
I had repoussed the lid design on a piece of silver some 5” square, and now had to get it down to a size and shape that would actually serve as a lid. I started by placing the bowl on it, and scribing around it. Then I sawed out the silver. Then I started selectively grinding away silver, to make it fit. Then I realized although the instructor was undoubtedly correct that attempting to make a template to fit the lid to the inside of the bowl for the soldering process would likely be unhelpful, the technique would probably work fine for this part of the project.
It also occurred to me that since my bowl is not perfectly round, that I had to keep track of the top and bottom of the lid—that is, if by some miracle I had managed to perfectly scribe the inside diameter on the lid facing up, to fit I would've had to put the design facing down.
In other words, I do not think in three dimensions particularly well.
It also occurred to me that taping (this time double-sided tape was an ideal solution for attaching template to metal) the template over the top of the lid (i.e. the repousse sticking up, which in effect slightly domed it) would distort the template, making the it too small. I carefully transferred the register marks to the other side, and taped it to the bottom of the lid—which was easier to saw in any case, having far fewer black sharpie marks. I was also pleased to note that my skill in sawing was slowly coming back, though I roundly cursed the idiot who ordered the student benches for only getting right handed ones: this meant I had to either rest my forearm on the sharp edge, projecting some 2” above the bench top, or wedge it below the bench top. I will say that I much prefer the standard bench pins to the fancy things Fike had us make: they're more suited to my style of (and scale, I suspect) of work.

sterling silver, chased, repoussed. 3-1/4” diameter. The piece on the left is part of the lid, but still needs to be sawn to shape and inserted in the bowl.
I concluded after getting the lid to fit inside I would've been better off making it a perfect circle, rather than attempting to follow the contours of the bowl, which I did only erratically. I sheared off the excess part of the lid to get a straight line, and discovered that someone has been mistreating the shear: unlike the large shear, it put vertical dents in my metal, which then had to be sanded out.
But at last it was time to braze the knuckles on. After pounding the large part of the lid down flat for three knuckles, I discovered it only needed space for two...until the other three had to work with it, so I was glad for the initial misunderstanding. By this time, I'd probably read the directions for making this hinge 10–20 times. I managed to braze the knuckles onto the two pieces, in three tries, using 14gauge spacers—without slagging the knuckles, without brazing the spacers to the knuckles, and, so far as I can tell with usable spacing between them.
Then, of course, I sawed part of the knuckles off. It remains to be seen how this will affect the functionality of the hinge (I can't predict.) I sawed the first set of slots between the double knuckles, and realized I needed needle files the school doesn't have (and that I hope that I do.) I have decided to slice the bowl open—that is to say, make a mortise and tenon joint between the small part of the lid and bowl, which, in contrast to the instructor, I believe will be easier than attempting to fit the lid exactly to a particular portion of the bowl. The slot will double the soldering surface, and hold the lid in place.
Conclusion.
About a week out from the due date I began to stress out. My hands were a mess, with painful cracks, particularly in my thumbs, and blackened with metal oxides (something the wizard oh-so-fondly recalled from his auto-mechanic days). So I avoided going to the studio for three days, though in part I had things in the real world (corporate tax prep for accountant, take f2tE to dr) that could no longer be avoided. At that point, I concluded that, important as I think making deadlines is, this one was interfering too much with my long term goals of the class.
This project has followed my usual modus operandi, which involves adding more and more related techniques till they overcome my skillsets. Usually, if I've badly overestimated, I back up to what I can do and ramp up a little more slowly. This was not such a wretched mismatch that I don't think I won't enjoy having the piece on my dresser, so despite its many flaws, I think I'll be happy: but the hinging/lid attachment, the last major hurdle (riveting the leaves on doesn't worry me nearly asmuch, as I've done that before, though not on a curved surface) to overcome.
I had hoped to practice more soldering before getting to this point in this project. It's obvious, after the fiasco with the rim, that I desparately need to ramp up those skills. Besides, I want to start on the beads and clasps, which have far more immediate application to my work, and the semester is half over: I estimate I've put between 100 and 125 hours into this project already. Thus, I've decided to finish as much of this project as I can before the due date, then work on it between other projects, with the hope that I can complete it, as well as the rejiquar box, which has been languishing these last 15 years, by the end of the semester.
My overall assessment is that raising is, or could be fun, but the piece I loved most was a tiny (2”?) diameter bowl, perfect for making beads, that A. made. I'm interested in forging, because of its applications for mixing with wire-wrapped beads (e.g. Mary Lee Hiu's early work); the instructor says s/he knows how to do Japanese engraving, and I'd love to learn that. The opportunity to cast is coming up, and I've put some thought into beads that would take advantage of casting's strengths, some of which are not readily duplicable, even with pmc.
The single most important skill set I need to practice is soldering. If at all possible I'd like to make at least one more hinged piece, as again, hinges have applications for clasps. But it's time to move on.
Sylvus Tarn, file created 21feb07; corrections and minor clarifications, 22feb07. N.b.: this is a preliminary post. After I get the piece done, I expect this page will become a subindex, with each of the various sections made into their own posts.
UPDATE: added tags, 09apr2020
Unless otherwise noted, text, image and objects depicted therein copyright 1996--present sylvus tarn.