The easiest method I know for beginners is to double your thread and to use a tool to guide your knots.
To begin: you may pre-string all the beads to be knotted all at once, or you put them on one at a time. The former is faster and you can easily hang the piece to prestretch your thread; the latter easier for beginners.
Then, make an overhand knot.
At the beginning of the piece, you may throw the already knotted beads through the loop (if you've prestrung the beads); as it gets longer, or if you are putting the beads on one at a time, you'll place the knot on needle end. I'm assuming you're using a flexible wire needle, and following the guidelines I've posted in tips and tricks page with regard to thread thickness versus hole size, waxing, etc. You may also want to hang your thread, with the beads on it, to pre-stretch it overnight.
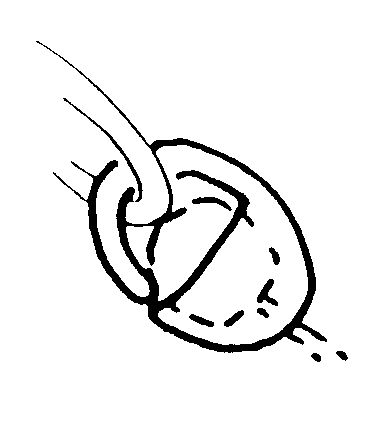
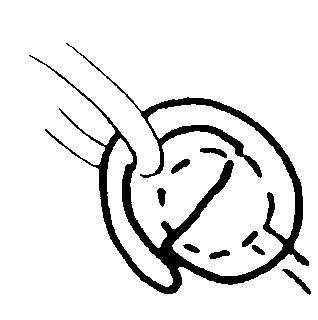
You should now have a piece of string with slip knot/clasp or ending, and at least one bead on it, with a large loose over hand knot. Insert your tool—an awl, large tapestry needle, or my favorite, #5 forceps (commonly sold in shops as “beading tweezers”)—in the knot, and drag it to the bead; slowly and evenly tighten. If it starts to tighten too much before you get it all the way to the bead, you spread the tips of the tweezers to enlarge it again, so that it will easily “travel”. With the other tools, you will have to pry the knot open with your fingers, which is not as hard as it sounds.
Holding the needle end of the thread in one hand and the tool in the other against the bead, pull knot tight. Remove the tool. Split the thread and pull, which will move the knot that last little bit and tighten the knot nicely. Now add on (or slide a pre-strung) bead; shoving it tightly against the knot (not so much you fray the thread) will snug the knot. Repeat until finished. If you have the patience, I recommend practicing before starting the actual project so you can get a feel for how hard to yank without worrying about breaking or fraying the thread: then you'll know where the limits are.
Beginning, finishing and knotting back are topics for another time, I guess:)
Yet another letter—I've even dug out some ancient illos to accompany, back when it was easier to make a drawing than shoot a pic (digital cameras were crappy back then....) Some day I'll have to have someone photograph me while doing a repair.
Pearls (of any type) are traditionally strung on silk. I recommend it for its sheen, which matches the luster of pearls nicely. If you knot, you should pre-stretch your thread, as that is one of its disadvantages vis-a-vis 49 stranded cable.
You will simplify your life a great deal if you double your thread; use a flexible wire needle to string on the pearls. Do not wax! If you have never knotted beads or do not feel you are experienced I recommend the use of bead tips. Use the regular kind, in gold-fill or sterling (they're not strong enough, nor, I suspect, even available in 14K); don't use those ugly basemetal clamshell types, they'll cheapen the look of your piece. Unless your pearls have unusually large holes (or you plan to string multiple strands from one bead tip), you'll want the smaller size (.028).
Even freshwater pearls can profit from knotting; you need not knot every bead, just every so often, say 3–5 pearls. Thread on your flexible wire needle, double your thread, and knot the end; be sure to leave extra thread for finishing, knotting etc. (If you're knotting every bead, cut a piece of thread 4–5x the finished length of the piece. It should be approximately 2/2-1/2 the finished length after doubling. If you don't intend to knot, double the finished length plus six–10 inches on each end is plenty.)
Now string on your bead tip such that the knot lands in the little cup. A nice finishing touch is to string on a small (2–3mm, depending on the size of the pearls) metal bead to match your clasp; then string on the pearls. Knot between each bead, every few beads or not at all, as desired. You can use knotting tweezers (No. 5 forceps), an awl, or a tapestry needle to help your knots travel down to the bead, and get them to snug up by splitting the threads and pulling.
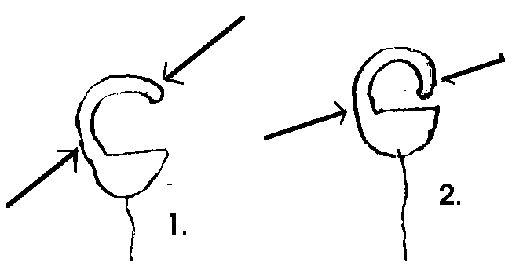
First bead tip is too small for thread—overlarge knot prevents tab from slipping into cup properly. Second bead tip has tab on outside of cup, a common beginner error.
Reverse this process for the other end, except tie a square knot (after cutting off the thread near the needle) to snug the bead tip to the rest. Put a tiny dab of watchmaker's cement or cyanoacrylate adhesive on the knots in the bead tips and trim close to the knot with sharp cutters. Use chain nose pliers to shut the tabs around the rings of your clasp. The bead tip tabs should just roll into the cup.
Arrows show how jaws of pliers should be positioned. Note changing angle. Rings of clasp omitted for clarity!
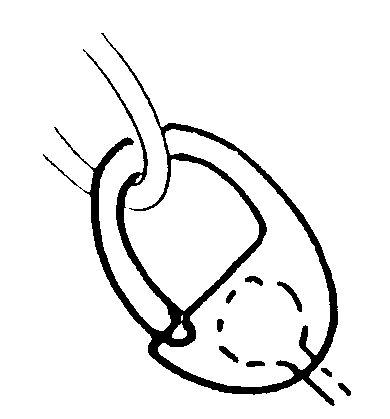
Correctly proportioned knot in properly closed bead tip—tab should go into cup at least this much—more would be better.
The traditional and more sophisticated way to finish pearls is with bullion, or French Wire. It looks like a coil, or slinky, and comes in different diameters. Pick one that fits comfortably over your thickness of thread, and cut a piece perhaps 1/4” with sharp tools, so the ends do not snag on the thread (because then it stretches out like a broken slinky, and there's no fixing it.) Thread your needle as before, string on 3–4 pearls (preferably with slightly larger holes), then your boullion and the clasp; Now go back thru the bead closest to the boullion, pull tight, knot around the thread, snug up the knot, until you get to the last bead. This time, tie the loose ends around continuing thread, string on the rest of the beads, knot all but three–four, string on another piece of bullion, and the clasp, then go back thru the bead closest to the boullion, knot around it, and continue till all beads are knotted. Put a tiny amount of adhesive on the knot where the ends are, and clip. I recommend flexible adhesive, such as watchmaker's cement.
If it looks more difficult, it is. You must judge how play to leave in the thread for the knots on the second end, and getting the knots to all snug up properly takes some practice. However, there's no hardware except the clasp, and the bullion won't scratch the pearls. Professionally knotted pearls should be strung this way.
If your necklace is endless, then the simplest thing to do is string on the beads, knot as desired, and tie the ends together. A more secure finish leaves the first several unknotted, and they get ‘knotted back’ (as with the bullion technique) instead.
Unless otherwise noted, text, image and objects depicted therein copyright 1996--present sylvus tarn.