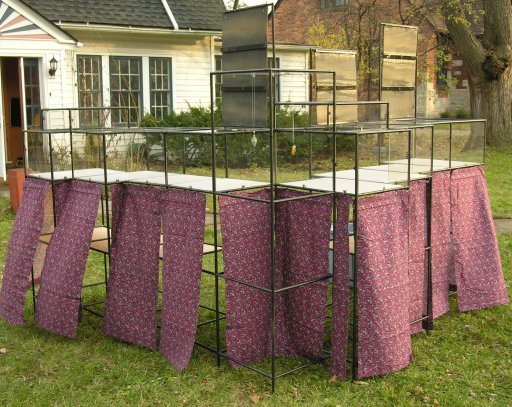
This unassuming black structure represents a great deal of effort on the part of my father, who was the original designer, my brother the engineer who modified the design to my specifications, my spouse, who made additional pieces, and, of course, myself. Along the way I made a great many mistakes.
This post primarily documents how to put the thing together, at
least enough should I decided I need to do so again in the future.
Along the way, however, I'll attempt to throw in some wider
observations on what I learned (or didn't) about booth design.

Ready for display materials. Note the corner display, which comes in two versions—one with hooks, shown here, for displaying pendants, and plain. Jewelry does not read well in booth shots, which is why you're always hearing advice about putting 16x20 blowups of your jewelry on the back wall so the contents of your booth will ‘read’ from 30’ away.
As is so often the case, conflicting desires got me into trouble. My father has a love classicism and simplicity I've never been able to emulate and this has driven everything the man has designed for me. Because I make reather large pieces that require very large neckpieces, the height from the shelf to the top of the case was originally 18”; and all the pieces were 18” square, roughly 6x18” or 18x24”. He also based the height of the showcase to be equal with that traditionally shown in jewelers’ shops, roughly double the shelf-to-top height, plus another 6” for legs. Again, all the poles were one of three lengths, a tribute, given the ‘jagged’ silhouette, to the care he put in the design.
Only problem is, art fair showcases need to have the shelf height (on which the displays or pieces rest) at hip height, and the top roughly at chest height. Even if the top had been high enough the 18” distance was much too great. Now, I'd been doing art fairs for years by this point, so you'd think I would've noticed this little difference, but no...
I'd noticed some other problems as well. My scheme to cover the bottom part of the showcase with one long piece of fabric, attached by means of fabric pockets that required it be slipped on as the thing was built was totally and utterly and horribly impractical. Also, 1/4” tempered plate glass is incredibly heavy. Even 1/4” plexi is heavy.
So I decided to make some changes. By this time my parents had moved far, far away, so I called upon my engineering brother to help. One of the things that sacrified was the low number of types of componets. Instead of three sizes of glass, the design jumped to six sizes, of which half were 1/8” thick, and half 1/4”. This came about for two reasons: one was to save money by cutting down the old pieces, the other was to reduce weight on the vertical pieces, which don't need to be as rigid. Of course, this meant I had to buy two kinds of clips.
Not only that, the company had changed the designs of the corner brackets, coming up with a new, much beefier design. However, they're also much uglier. I put the shelves on the bigger ones, where they wouldn't show, reserving the daintier version for the tops. Wrapping the many pieces of plastic was also a major pain, so in addition to the three carryalls I made to tote the shelves, I constructed fabric ‘books’ with enough leaves to sandwich each sheet of plastic. And I ditched the glass entirely, deciding that I would simply replace any tops that got too scratched by the inevitable keys, metal pens, purses, etc that customers routinely dump on one's showcase.
- 82 15” poles
- 3 18" poles
- 2 13-1/2" poles w 2L shape ends (pad hanger)
- 2 16-3/4" poles 2 2L shapeends (pad hanger)
- 1 11" pole with 2I (straight) end
- 2 24" compound poles (2I internal) with 2L ends
- red knock-apart tool
- nylon ended hammer
- 56 1/8" clips (green x-stitch bag)
- 149 1/4" clips (lg silver zigzag bag)
- 59 curved old-style corner brackets (blue heart bag)
- 52 straight heavy duty corner brackets (yellow crescent bag)
still to do: count plexi, photo metal components, and slices tied up. Oh, and write a post on how actually to put the thing together...!
created 27nov06; add'l material, primarily intro, 9jan07.
Unless otherwise noted, text, image and objects depicted therein copyright 1996--present sylvus tarn.
Sylvus Tarn