Update, 2008.
The following is a sad testament to the grabit and holdit theory. GlassAct once had a very eminent and old-timey beadmaker come to teach a class—but only if we agreed as students not to teach the material ourselves! Needless to say, I didn't take the class, and the oh-so-secret technique has, along with sister techniques to achieve the same effect, made their way out into the world.
Even more precarious, in my opinion, are demos. The whole point of a demo is to, well, demonstrate. This is what Tink did, and what I recorded, using my own words, understanding and photography. Nevertheless, Tink asked me to take the post down. Not that I ever felt she had the right of it, and knowing what I know now (the part of her explanation, the ‘landing pads’ actually was developed earlier, as Bethany Adams told me she learned that from a mutual teacher, Mari Johnson) I would've maintained the courage of my convictions, and told Ms Martin, ‘too bad’.
But wishing to be a peaceable sort, I did—for three years. Now, in my opinion, she's had plenty of time to sell the info, develop new products, etc. So, it's back up. I wish Tink Martin the best in her endeavors, but would recommend that if she doesn't want folks to document her working methods, then not to demonstrate them!
—respectfully, sylvus tarn, 3jun08.
Toledo, about an hour south of Ann Arbor, is a thriving glass center, and, I've often supposed, one of the reasons glass beadmaking is so big here: at least one of the programs responsible for churning out so many lampworkers is over seen by Don Miller, whom I know takes marble making and other classes at the Toledo Museum affiliated Glass Studio...but oddly enough Toledo is just now getting its own glass bead group. I went to its third(?) meeting last night, invited along by my friend Kristin Perkins.
Tink is known for her elegant vessels, which quite often are one or perhaps two colors. Nothing beats such elegant simplicity for showcasing the color and clarity of glass, but it requires excellent technique a good feeling for form. Tink has both. She uses hollow tubing about a foot long (“any wall thickness works”) any kind of stainless (316-L or whatever—a personal note: 316 is food grade, as opposed to 308 or 304. Since you will putting this thing in your mouth, that's something to consider). She prefers Alice's bead release, though she considers Fosterfire an acceptable substitute.
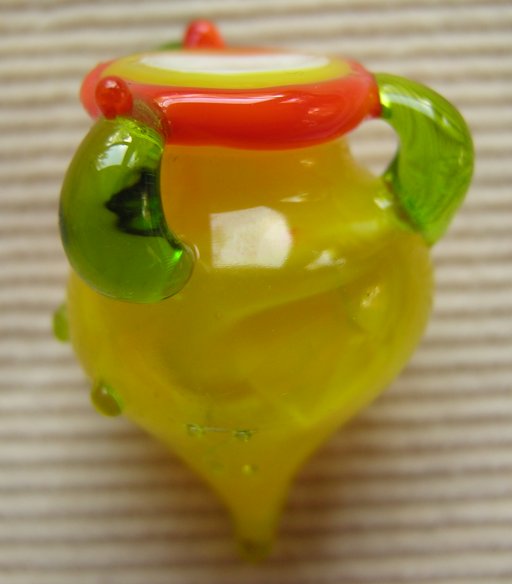
My first effort. It has a cased neck and three handles but otherwise is similar in design (if not in execution) to Tink's vessels.
Materials and supplies:
- alice's bead release recommended*
- Effetre glass, opaque or transparent
*I found flame-dri I typically use works just fine.
Special tools:
- small steel dental spatula
- small six sided graphite reamer (sharpened graphite rod works too)
- 1/4 stainless steel tubing
Tink began by finger sanding her dry bead release smooth. She doesn't recommend flame-drying, because the release inside the tube dries more slowly and can end up shooting hot steam into the mouth of the wouldbe lampworker (ouch!). To dip tubing, place your thumb over one end, while dipping to the depth desired (hers were coated 20–30mm or so); lift tube out of release, and blow, to remove the release from the end of the tube. Stick into a bucket of sand (or whatever) to dry.
Tubing is a little awkward to rotate at first, but you get used to it, she says, and it's really not that big of a deal. (In fact, I was surprised that I was the only other person in the room who'd ever used it in a beadmaking context—obviously the furnace folks use it all the time, but theirs are 5’ long and cost a hundred bucks—or more—each.)
Start by building a thin (about 2mm thick) cylinder at the end of the tube. Add dots of wisps of glass to even up the proximal edge and square up with a knife edge. (N.b. Tink uses the ‘cutting edge’ of her butter knife against the glass, and the other edge along bead release, e.g. for straightening cylinder edge. This keeps release off the vessel.) Then add a thin (approx 2mm coil) around the edge. It doesn't have to be completely melted in, as adding the body of the vessel will flow the lip into the neck. These steps require a lot of fiddling to give a good form.

2nd effort: I forgot the lip on this one completely, and the handle is a mess. (I removed the other two: you can see a ‘landing pad’ on the right shoulder.) But on the plus side, the vessel part is a little better.
Next, ‘coilpot’ glass, starting at the end of the tube. Yes, the vessel part hangs off the end of the tube. Don't worry about holes or cracks; they'll go away. Don't worry too much about form. [Here I have to disagree. I find I have an easier time if everything starts out neatly. However, I think Tink put a lot more effort into ‘cleaning up’ her vessel as she melted it down than I did. She claimed she was just patting down proud coils and whatnot to pass the time as it melted, but...or maybe it's just the kinks in my personality manifesting themselves.]
Coilpotting makes the initial vessel a little easier to blow, and gives an idea of its overall size. When finished melt down to perhaps half its former size: this step evens out the wall thickness, essential for even blowing. After getting the glass good and evenly heated, then comes the fun part: blowing. The initial bubble is quite small, but I find I cannot even approach even wall thickness if the bubble is not centered, and the heat evenly distributed throughout the mass.
While still rotating tube, tip piece up (allowing a skin to form) insert other end in mouth, and blow. When someone asked, how hard, Tink said she was blowing gently. It's been my experience that you start very soft, and as the glass stiffens, you blow a little harder. The goal is a nice even and relatively (1.5—2mm) thin wall.
Heat and pull bottom to a point using a rod. Examine vessel for handle, and place small dots (landing pads) on lip and shoulders. (Not too small, or there won't be enough of a platform for the handles to attach—perhaps 2 or 2-1/2mm or so, once flattened.) This is a good opportunity to profile the best side of vessel and hide lipwrap joins. Flatten dots using a small (.5x2cm) metal spatula. Next heat rod end to get a pea-size (7–8mm) ball of glass on end. Drop onto shoulder landing pad, and pull it over to lip landing pad while counting at a steady pace, 1,2,3,4 ...this is not time stiffness of glass, but help in applying equal amounts to both handles.
Heat handles: they will ball up. If they begin to collapse too much open with small six sided reamer, sharpened graphite rod, or tungsten pick. If the major massing of handles isn't equal, add (or remove) glass till it is. Once even, heat till glowing, and use graphite reamer to open up: how you tilt vessel/tubing will determine their eventual shape. (Tink was not able to do much tilting, because by that time her bead release had well and truly broken: she made the handles by wedging the vase against her torchtop marver. However, she says bead release breaks all the time, and so long as it lasts to the blowing part, it's not a big issue. She didn't get to demo her tricks for healing cracked necks/lips, though...I found heating and marvering seemed to take care of the problem.)
Warm bead and place in kiln.
file originally 06may05, clarifications 20may05, intro in main post & reposted 3jun08
Unless otherwise noted, text, image and objects depicted therein copyright 1996--present sylvus tarn.