Okay, the point is not just to paralyze you with boredom while I go through every single bead I put on a 5’ (150cm) bead curtain strand. It's because I've had people email me, asking for patterns. I don't use a pattern, but on the other hand I do have a set of algorithms I use to generate the sections of larger beads.

grouping beads up, readying them for use in sequences. This is overkill for a bead curtain, but a handy technique for more serious stringing.
Perhaps I should back up a little, and discuss the larger overall theme. Though not as evident in this strand as some of the others, if I have some really large, dramatic beads (e.g. 25–40mm wide, as for some of the wings), I'll usually put two or three of them in a strand, spaced roughly equidistantly—that is, the first a foot (30cm) or so from the bottom, and the next perhaps 1/3 from the top. Each of these will be positioned in a 3-9” (75–200mm) long “sequence” of big beads (e.g. > than seed bead size). Each section is then spaced by an inch or two (25–50mm) of seed beads. Not only does this episodic approach automatically give a rhythm but it also makes designing easier because the process is broken down into manageable chunks.
Aside from roughly keeping track of where I'd want my pair-three big dramatic focals to go (not an issue this time around) this means I only have to keep track of 6–9 inches beads at a time, and quite often, only the beads on one side or t'other of the ‘center’. It's really not very difficult! A couple of notes—see the finishing post for beginning and ending the strand; read the images from left to right (uncut tigertail on spool is to your left, cut end where beads are being added is to your right); click on the images for 512 pixel versions and again for full size, which admittedly is almost certainly overkill. Ok, let's begin:
This being the bottom of the strand I've weighted the visual focus, that is the 16mm triangle bead at the bottom of the sequence. The beads get straightforwardly smaller to our first constriction, halfway along, at the 8mm and 4mm purple glass; then the diameter of the beads jump up again with the disk which note is still no more than 2/3 the diameter of our beginning 16mm triangle, and once again decrease in size till we get to the 6mm fac czech purple, where we have another, less dramatic than the first constriction and jump to a 6x16 drop. Drops are wonderful transition beads because they're bigger at one end than the other, with the blunt end being ‘round-bead like’. Thus they substitute for, and pair well, with rounds. Handy, that:)

An absolutely typical design, that starts with a 4mm to transition from the seed beads, rapidly increases (by way of a faceted rondell) in diameter, a slight constriction (built in as it were) by way of a 6x16mm drop, thence to our secondary focal, a 10mm purple moon, to a 12 or 14mm star our main focal by virtue of its greatest size and unusual shape. Once again I use a disk to set off the top point of the star, coupling it with a 8mm facet rondell and 8mm round. Note that these three beads taken together echo and mirror the teardrop below. I had so many good shapes at this point that making this was like taking candy from a baby. We finish off with a minor constriction (the 4mm purple) and finally a 4x12 oval, which transitions us back to the seed beads and “weights” the focal towards the bottom of the sequence. This is very typical of my bead-curtain design.

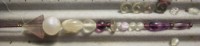
This sequence, which is definitely on the long side, is somewhat misleading because the fluorite triangle just underneath the white pixie is tipped up on its side; thus it looks more like 4x12 rectangle. It isn't. (I couldn't resist showing the chaotic way I actually string, which is why the photo shows more of the surrounding mess.) The sequence starts with a straightforward buildup of sizes, starting with a (perhaps) 9/0 seed, a 3mm czech, a 4mm 5301 austrian crystal, a 6mm, some chips to “slow down” the increase, an 8mm, a 10mm, the 16mm triangle, a 4mm purple, which both in its contrasting hue, much darker value and small size briefly pauses the eye, before going on to our main focal the big pixie. On top of the focal, the decrease back down to seed bead size is slowed down by the use of the large oval, the 6x16 s-curve, plus numerous round beads, of which the 6mm clear colorless facet rondell just to the left of the 6x16 fluorite drop acts as a mild pause/constriction. Needless to say, it takes me a lot longer to articulate this than it does to string it...

This pattern is kind of interesting because it has no clear focal bead, but rather two sets of large beads—the 3 16mm triangles to the left (bottom, remember) and three white beads of decreasing size on the right. In fact the whole right sequence is in effect a giant triangle, with the greenish, light fluorite disk serving as shape and value transition to the purple 8mm round and 7x16 drop. Now, for extra credit what bead in this pattern really doesn't belong? That's right the 4x16 oval: it's not really integrated into the rest of the design. I do however like putting beads in threes, and since I easily had a strand's worth of triangles, felt free to use them in luxurious, happy abandon.

Ah, here again I wasn't paying (sufficient) attention to how the lower and upper (right and left) portions of the design worked with each other, and it shows. The sequence starts with a very bottom heavy pattern (like the first sequence shown) with a reversing triangle stuck on top of it to balance it a bit. Not my typical style (it was the urge to use triangles profligantly) but fair enough. But what's going above that triangle? Ewwww, bad transition! Well, ok, it is somewhat of an artifact, because the bead is once again tipped on its edge: it's actually a diamond, its width at least half as great as the width of the tri below. Even so, this section though acceptable on its own, is a tad on the delicate side to co-ordinate with the boldness of the paired triangles and 14mm+ pixies. At this point, you're probably wondering why you not only have to read an excrutiatingly boring explication of this crazy woman's stringing algorithm, but it's not even a good design! Arrghh...when will the agony end?
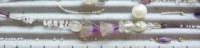
Ooooh, maybe she hasn't totally lost her touch after all. Unfortunately I was once again not paying attention, this time to the photography, so you'll just have to imagine all those chips shoved together. Again I started with a 9/0? seed bead, a 6/0 (4mm) purple, then a small moonstone rectangle, then a series of chips, sorted, you'll notice from smallest to biggest, and from flattish to chunky as well. If you're willing to take the time to sort chips, you can really get some lovely textures by spacing them with seed beads. See the 2–>1 pages for good examples. Continuing, we have a fairly dramatic jump in the shape of a moonstone oval, a pair of matching triangles (courtesy of the sorting—see top image), then a disk and 10mm clear colorless (clc) frost before echoing the moonstone oval, another ‘lengthening’ interruption in the 8mm moonstone, before the moonstone diamond (again echoing and reversing the rectangle below) before ending with the 6/0 and 9/0 purples—exactly the mirror image of the way we started. Classic.

But what's this? Fun with seed bead patterns? Yes indeedy. Back when I first started these, I often had unsorted piles of seed beads, and would sort a variety of appropriate types by color, value etc. If however, your roadkill dish is small, (yes, I not only used up my own, but then had to beg and whine for my partner's!) you can alternate in various striping patterns (abababab; aaabaaabaaab [with bugles substituting for the 3a's if you like) or sort, say, six purples from dark to light, etc. The possibilities are endless. This is what I think of the spattering-blend approach (which by the way can be executed in two dimensions as well) and I happen to really like it for subtle naturalistic shifting from one color to another—it works particularly well for two colors close to each other.
Now that I'm getting near the top of the strand, I'm a little more interested in stopping the eye from shooting up to the ceiling: thus the focal center is the top (right) of the sequence rather than the left. Otherwise, in its proportions, it's a great deal like the very first sequence, except upside down and a little more compressed overall. Note also the light-light dark, light-light dark (with the 16mm tri and 7x16drop visually functioning as one long tri) ‘meta-striping’, which is orthoganal to the smooth transitions of shape and size, and thereby breaks the overall pattern somewhat. In other words, you not only want to think about how size and shape work together, but value and hue as well: add surface (lumping together matteness/shinyness, opacity/translucence/transparency, smooth/etched faceted contrasts), and you're thinking along 4 axes at once. —And people think stringing is easy! (Well, it is, but just like driving a car, there's a lot to keep track of at first:)

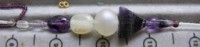
Getting to light at the end of the tunnel, or at least strand, here. This simple pattern has a lot to recommend it—just a 4mm and 6mm fac rondell to set up the focal area (the three tris) with again a larger disk and 4x12 rectangle inserted on the reverse to elongate the top (right side) of the design. The 4mm crystal rounds spacing the tris are not absolutely necessary but they help to visually pop the tris and tie the 4mms on either end into the pattern. Note again that I've taken the trouble to choose three similarly striped tris to emphasize the rhythm. Not shown is the 4 or 3mm round that no doubt was strung to the right of the rectangle.

Last pattern! Excepting a couple of extra 4mm crystal rounds on the top, this sequence is a perfect mirror image. Normally I wouldn't “waste” so many “good” beads (e.g. tris, stars, etc) because I often had 20 or more little beads (3, 4, and 6mm) to each fancy bead. Older patterns, therefore, might substitute a 6mm, a 6mm disk (if I had one) and 3 4mm beads for 6x16 drop; or 3 4mm for 4x12 shape. But as I mentioned at the beginning of this post, I had a wealth of fun shapes from which to choose, so designing this strand was very easy. Nevertheless, the principles of design can be applied to any sort of beads, though as you'll have surmised a good assortment of small beads—indeed of a variety of sizes up to 8 or 10mm—is extremely helpful.
What, you're still awake? Congratulations, and happy stringing!
See also the finishing and hanging posts for additional info on this project. File originally created 01apr06; add'l text 04apr06.
Unless otherwise noted, text, image and objects depicted therein copyright 1996--present sylvus tarn.